12.31.2008

White Bean Dip with Pita Chips

White Bean Dip & Pita Chips

Did You Know? The "pocket" in pita bread is made by steam. The steam puffs up the dough and, as the bread cools and flattens, a pocket is left in the middle.

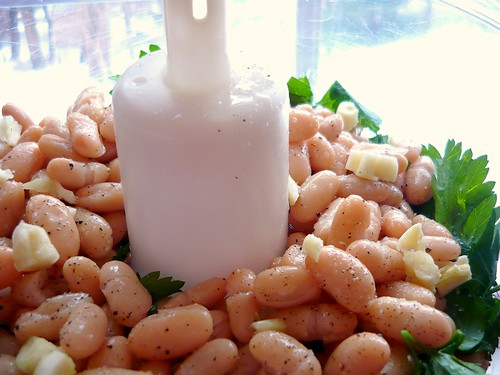
This dip has become my signature recipe at neighborhood get-togethers. It's always expected to be put out before our main course with some homemade pita chips, and the leftovers (which I usually have to set aside) are always requested by my friend Ali. It's smooth and creamy, fruity from the olive oil, and really filling. The cannellini beans are rich in protein and fiber, and the oil provides a good dose of heart-healthy fats. The fresh parsley provides a nice pop of green, and the garlic gives it a nice bite along with a good amount of disease-fighting compounds and manganese.


White Bean Dip

This dip is excellent as is, but it also lends itself to a handful of variations. I love it with plump sun-dried tomatoes and basil, with roasted red and jalapeno peppers, with caramelized onions, the list goes on. I'd love to hear some other suggestions you may have, or maybe a favorite dip that you serve. I'm always looking for new recipes to break out at parties. Until then, here's the original...


White Bean Dip
1 (15-oz) can Cannellini beans, drained and rinsed
2 cloves garlic
Juice of 1 lemon
1/4 cup fresh parsley
1/4 cup Olive Oil
Salt and Pepper


Puree all ingredients in a food processor. Season with salt and pepper to taste. Enjoy with homemade pita chips, as a sandwich spread, or with raw veggies.

Pita Chips


Pita Chips
6 Whole wheat pitas
Olive oil cooking spray
Herbes de Provence
Salt and Pepper


Preheat oven to 400.

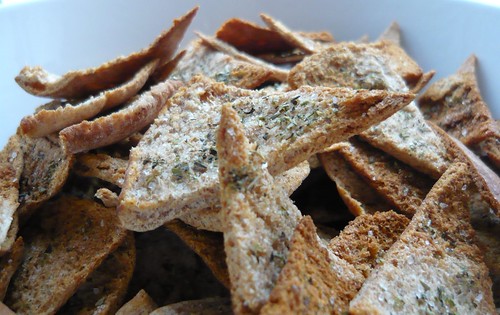
Split the pita rounds all the way along the outer seam, so that you have a total of 12 circles. Cut each round into 8 wedges, like you would a pizza.

Lightly spray a few baking sheets with cooking spray, and arrange pita wedges on the trays (do not overlap). Spray the wedges, and sprinkle with herbs, salt, and pepper.

Bake in the preheated oven for about 10-15 minutes, flipping halfway through, until golden and crunchy. Enjoy warm or cooled with the white bean dip.


12.28.2008

Ricotta & Pineapple Pie

Ricotta & Pineapple Pie

Did You Know? The pineapple is not a single fruit, but a cluster of 100-200 tiny fruitlets.

Every Christmas my Dad brings home really tasty desserts from the North End, and usually a ricotta pie from Modern Pastry is on the list. Sweet and creamy, and much lighter than a cheesecake, it is soooo good. Modern fills theirs with a chocolate ganache center, but I think I like it better without. If you've never had a ricotta pie from Modern, get one! Just google it for the piles of rave reviews you'll find about their beloved pie. That is if you're not in the mood for baking up your own, because this recipe couldn't be easier, thanks to Susan over at Food Blogga.

The ricotta provides a somewhat grainy texture, which I love. And being someone who hates cheesecake, this pie is not like its thick cousin involving cream cheese. It's sort of like cannoli filling made into a pie - could anything be better than that?

Ricotta & Pineapple Pie

The pineapple really sent this recipe over the top. It's sweet, but not too sweet, and the shreds of crushed pineapple really work well with the smooth ricotta. When I made this, I halved the original recipe (which was for two pies), but I forgot to halve the pineapple. I think it tasted perfect with the full 20 ounces of pineapple, but feel free to use 10 ounces if you like.

Ricotta & Pineapple Pie
Pate Brisee (this pate brisee is for a double crust pie, this pie recipe only has a bottom crust, so halve the pate brisee recipe, freeze half of the full recipe, or make two ricotta pies!)
1 pound ricotta cheese
1 cup heavy cream
1 cup sugar
1 tablespoon cornstarch
1/2 tablespoon plus 1/2 teaspoon pure vanilla extract
3 large eggs
1 (20-ounce) can of crushed pineapple (drained)
1/4 teaspoon ground cinnamon (dusted on top of pie)

For the filling, place the pineapple in strainer set over a bowl for at least 1-1/2 hours, or preferably overnight. Discard the liquids. This will create a thicker pie filling and keep the crust crispier.

Add the ricotta to a large mixing bowl, and beat it smooth with an electric mixer. Beat in the heavy cream, sugar, cornstarch, and vanilla. Beat in the eggs, one at a time, making sure the texture is smooth. Finally, stir in the pineapple.

Preheat your oven to 425, with a rack set in the lower third of the oven.

Remove the dough from the refrigerator. Roll it out on a lightly floured surface into a 10-inch circle. Place the dough round in a pie plate, and freeze for 15 minutes.

After the fifteen minutes has passed, remove the pie plate from the freezer, and pour the filling right to the top of the pie plate leaving just a bit of room for the filling to puff up. Sprinkle the top of the pie with ground cinnamon. If you have some extra filling left over, as I did, you can pour it into a ramekin for a crustless version, and follow the same baking instructions.

Bake the pie at 425 for 15 minutes, then lower the heat to 350 degrees and bake another 30 minutes. The filling should be slightly puffed, golden, and set, not jiggly. Remove from the oven and let cool on a rack. Serve at room temperature or chilled.

Ricotta & Pineapple Pie

12.26.2008

Happy Holidays

Christmas Star

I hope everyone enjoyed their holiday, and were surrounded by good people and even better food. My Christmas this year was pretty incredible, and I couldn't have asked for anything more. My family and I were so happy with all the amazing gifts we got, and I hope all of you were just as satisfied.

On top of all of the delicious food that comes with the holidays, are the generous amounts of presents. This year, besides the usual clothes and accessories, I got the best kitchen gadgets and gifts. Beautiful bowls and cups, porcelain measuring spoons in a rainbow of colors, and the cutest measuring cups I've come across yet. Little birdies nicely nestled inside one another. Their little feather tails acting as handles. Oh, and a Calphalon Dutch Oven (well I didn't get it personally, but my best friend gave it to my parents). And perhaps the King of all kitchen gadgets, what reigns supreme on most cook's wish lists...The KitchenAid Artisan Stand Mixer! I couldn't believe it. My sister and I have been begging for this for some time, and it couldn't have come at a better Christmas - right around the start of this food blog.


Christmas Presents

Although this isn't food related, it does have to do with recipes, and I am all about organic body care. I got the beautifully written "Organic Body Care Recipes" book by Stephanie Tourles. I don't know about any of you, but when I'm not cooking, that doesn't mean I'm out of the kitchen. I love creating all-natural masks, cleansers, and lip balms with soothing and nourishing ingredients. It feels so organic to incorporate whole ingredients without all those harsh chemicals. Trust me, your skin will love you for it.


Christmas Presents

So what cool gifts or recipes did all of you get, give, or bake up? I love hearing ideas to get me thinking for future holidays or birthdays. I'll be sure to post some delicious recipes very soon. They were all too good not to share with all of you, so stay tuned, and bring in the New Year in good company here at Buff Chickpea!


KitchenAid Stand Mixer

12.22.2008

Grilled Eggplant Parmesan

Grilled Eggplant Parmesan

Did You Know? Women in the Orient used to use the peel of the eggplant as dye to stain their teeth gray because that was all the rage.

Eggplant parmesan has always been a favorite of mine. The crusty, golden top, and the smooth and cheesy inside. But after changing my eating habits, and trying to really limit my dairy intake, I wanted to make an updated version of this classic to fit my new tastes, but still satisfy that craving. Not to mention, make something that the rest of my family would enjoy.

There's something about Italian food that is so satisfying and fun to enjoy with friends and family, but it can also be not the healthiest of cuisines. I try to get everyone in my family to eat a little healthier, and by offering fresh ingredients and flavors they enjoy, I think healthy cooking can be quite simple.

Salted Eggplant

Although this recipe does not provide the oily, thickly breaded cutlets of eggplant you might be used to, the flavors are in no way lacking. I love the freshness of this dish, and the fact that each ingredient is really present. The burst of the sliced tomato against the roasted eggplant, along with the sweet basil make this a wholesome dish your family will love anytime of year.

Grilled Eggplant Parmesan

Grilled Eggplant Parmesan
2 medium eggplants, peeled and sliced into 1/4-inch thick rounds
Olive oil
2 cloves garlic, minced
Sea Salt and Pepper
28 ounce can crushed tomatoes
5 Roma tomatoes, sliced into 1/4-inch thick rounds
1/2 cup Bread crumbs
1/2 cup Parmesan cheese
Basil leaves
1 lb. dried pasta (any shape will work)

Place eggplant rounds on a baking sheet and sprinkle generously with sea salt. Feel free to layer eggplant if needed, just make sure each layer is covered with salt. Let sit for about 30 minutes (you'll notice the moisture leeking out of the eggplant-that's what you want). After 30 minutes, rinse the rounds, then squeeze any moisture out of them (don't worry about tearing them, they've pretty much turned into sponges now). Pat dry, season with salt and pepper, and set aside while you heat up a pan.

Heat a large skillet over medium heat, and spray with cooking spray or a little olive oil. I used a griddle here, so I could cook all the eggplant at once. I tend to use cooking spray when I grill eggplant, because it has a tendency to soak up the oil way to quickly, and you end up using a bit too much. Grill the eggplant until nicely browned on both sides, about 15 minutes. Set aside.

Preheat oven to 400.

In a large baking or casserole dish, pour about 1/2 to 1 cup of the crushed tomatoes. Layer the eggplant on top of the crushed tomatoes. Follow with a layer of sliced tomatoes, salt and pepper, and a sprinkle of some torn basil leaves. Repeat, ending with a final layer of tomatoes, and some more torn basil and the minced garlic. Sprinkle with bread crumbs and parmesan cheese, and drizzle with olive oil.

Bake uncovered for about 30 minutes.

Meanwhile, cook your pasta and heat the leftover crushed tomatoes in a small saucepan. When the eggplant is ready, it's time to plate. Put a serving of pasta on each plate, top with some leftover crushed tomatoes, and finally place a few eggplant stacks on top. Sprinkle any basil you have left on top and serve with additional parmesan cheese. Enjoy - this was plenty for my family of 5. And made an awesome sandwich filling for lunch the next day.

*Note: The next time I make this, I will definately use another eggplant and a couple more roma tomatoes, so there would be three layers of eggplant and tomato slices, instead of two. Since I tend to add additional veggies into whatever pasta dish I eat, I served my pasta over a bed of steamed broccoli - really tasty and filling. FYI: The picture at the top was taken before I baked the whole thing. The sun was going down, and I wanted to capture the jist of it. The picture below is baked and plated (minus the broccoli).

Grilled Eggplant Parmesan

12.19.2008

German Chocolate Cake

German Chocolate Cake

Did You Know? German Chocolate Cake was not brought to America by German immigrants. The cake took its name from an American with the last name of "German."

I mentioned in a recent post that I had spent a delicious Friday night baking with my mom, so I thought I would share what expactly we baked up. Trust me, this post is not for the faint of heart...

One of my favorite people to cook for is my Dad, and when he called home from work the other day to request some sort of dessert from my mom, I took over the bakers role. I'd been wanting to test out this recipe for some time (knowing it was one of my Dad's favorites) so I thought this was as good a time as any. The recipe at hand...German Chocolate Cake. A decadently rich, layer cake that is not to be taken lightly. This particular recipe incorporated moist cake layers sandwiched between a caramel-like pecan and coconut spread, all of which was drowned in an intense chocolate ganache frosting

German Chocolate Cake Baking

What set this cake apart from other chocolate cakes I had baked in the past, was the addition of melted chocolate to the cake batter, instead of the usual cocoa powder. This definately intensified the flavor, but the addition of whipped egg whites took away any doubts I had that this cake would be to dense. After giving the bowl a good lick, I watched as my cakes rose to perfection in the heat of the oven. The daunting task awaiting in the future: cutting each cake into two layers. It didn't turn out all that bad, but they were by no means cut straight across. The coconut-pecan filling did a beautiful job at masking my imperfections. Not being a huge chocolate cake fan myself, I ended up putting a nice dent into this one. Trust me, it's really good, but really filling. I found myself hunched over on the couch after eating just a small slice.

A quick note about the frosting...mine did not set up like I thought it would, so I ended up just pouring the entire bowl over the top and letting it drip down the sides. The directions say to pipe it on, but the consistency I ended up with was in no shape for piping - much too liquidy. In the end, I loved how it turned out. It may seem like a lot of ganache to be pouring on a cake, but you won't be sorry when all is said and done.

I would have posted the recipe here, but I think David's step by step instructions are perfect as is...so check it out here and see for yourself! I'll leave you with an in-your-face slice of heaven...

German Chocolate Cake

Happy Baking...Hayley

12.17.2008

Stuffed Mushrooms: Two Ways

Stuffed Mushrooms

Did You Know? Of the 70,000 species of the mushrooms in the world, only about 250 are actually edible.

Mushrooms have always been a favorite food of mine. Ever since I was a baby, I can remember snuggling in my Mema's bed with my sister, and eating bon bons, string cheese, and occasionally stuffed mushrooms left over from dinner, all the while watching Annie or Madeline, two of our favorites. I've always only ever made my Mema's recipe for stuffed mushrooms, basically because they are unbelievable, but ever since I stopped eating cheese, I wanted to try out a vegan recipe.

The recipe I came up with is really quite healthful, and would be an excellent h'orderves to bring to your next Christmas party. Cremini mushrooms, in particular, are an excellent source of selenium, manganese, copper, and zinc, all essential trace minerals, as well as iron, riboflavin and B-complex vitamins. The hummus and walnuts add a good source of protein, and omega-3 fatty acids. The whole grain bread crumbs, olive oil, and basil top it off, for an excellent one or two bite food.


Stuffed Mushrooms

It was a little hard getting my sister to try these out, and since she was the only one home with me when I first made them, I had to get her to eat and like them. I don't know what it is, but every time she hears that the recipe I am making is a vegan one, she's skeptical. She think's the ingredients are going to be unheard of, and the flavors far-fetched. It's pretty annoying most of the time, but I guess most people are put off when they hear "vegan." This one, like most others, turned out delicious - for everyone. One of her friends stopped by soon after I took them out of the oven, and she prefered the vegan mushrooms over the original.

These mushrooms are really easy to make. The only somewhat tedious part is peeling the outer skin off of the mushrooms. It's a step that really isn't necessary, but my grandmother always does it, so that's what I do. I didn't want to talk about the non-vegan mushrooms and then leave you hanging without a recipe for those, so I've posted both. I hope you give the vegan ones a try though, because they were a hit for my family and friends.

Stuffed Mushrooms: Two Ways
8 ounces cremini mushrooms, skins peeled away, and stems removed and set aside*
1/2 cup whole wheat breadcrumbs
1/4 cup toasted walnuts, chopped
2 teaspoons dried basil
1/4 cup pecorino romano cheese, grated
1/4 cup red pepper hummus (I used Joseph's, but homemade would be better)
Olive oil
Salt and Pepper

*To peel the skins away from the mushrooms, I literally just use my finger to peel back the thin, brown layer on the outside of the mushrooms, so that they look like white button mushrooms when finished, and nice and clean.

Preheat oven to 350.

To prepare mushrooms, scoop out insides to make little cavities inside each one to hold the filling. Save the insides that you scoop out, and chop it all up with the stems that you removed previously. You want it to be chopped pretty finely, so that the filling tastes pretty smooth when cooked.

In 2 medium sized mixing bowls, put half of the chopped stem mixture into each. Add 1/4 cup bread crumbs and 2 tablespoons walnuts to each bowl. For the original (non-vegan) mushrooms, add the romano cheese. For the vegan variation, add the hummus. Season each with 1 teaspoon of basil and the salt and pepper. For the original mushrooms, add a few good drizzles of olive oil, to wet the mixture (the hummus does this for the vegan variation). Stir each bowl to incorporate all ingredients. You want to "smoosh?" the non-vegan mushrooms with the back of the spoon, so that it looks like a crumbly paste, and on the wet side.

Fill half the mushrooms with the cheese mixture, and half with the hummus mixture - mounding the filling on top, and packing it down. Place mushrooms on a greased (I used olive oil) baking sheet, and then drizzle a little oil on top of each mushroom.
Bake for about 20 minutes, until golden on top. Enjoy, and let me know what you think of both!

Stuffed Mushrooms

12.14.2008

Gingerbread Men

Gingerbread Men

Did You Know? In London, during the seventeenth century, gingerbread bakers had the exclusive right to make it, and only at Christmas and Easter were other citizens allowed to join in.

Christmas is almost here, and in my opinion, it's only second to Halloween. I don't really know why, it's not like we get presents on Halloween, I've just always liked the idea of dressing up, carving pumpkins, candy apples, and all that cinnamon-scented autumn stuff. But that's besides the point...it's almost Winter now, and just thinking about Christmas can put anyone in a good mood.

We just got our tree on Friday, and being the sole decorator in my house, I thought I had better get to work. It's not that no one offers to help. It's just my OCD takes over, and I would much rather do everything on my own. I like things a certain way, and I like my tree and house to look like a magazine picture. So I'm sorry to say (well not really), that there's no colored lights and preschool decorations in this house. It was hard to convince my brother and sister to get on board with putting all their decorations away for the first few years, but now it's just assumed that I'm taking charge, and creating a new theme for our holiday.


Gingerbread Making

I don't mean to sound like some sort of Christmas basher or anything, in the end everyone is really happy how our house turns out. They just need a little help to get there. Anyways, on to the baking. Every year my sister asks if we can bake gingerbread cookies while we decorate the tree, and every year I end up doing everything by myself. Now this particular episode is not because I like to do all of the baking. She just assumes "we can bake cookies" means "you can bake me cookies." I don't really mind, I'd probably tell her she was doing it wrong anyways. As long as someone is there to do the dishes (most likely my mom), I'm all set.

Gingerbread Making

So here they are, finally. I healthed up this recipe a bit, hoping no one would notice, and in the end they turned out great. No one thought twice that they had far less butter and sugar than the usual cookie. They're chewy and spicy and everything a gingerbread cookie should be. If you like a harder cookie, I'm sure you could just bake them a bit longer, or eat them the next day. Icing is really just a preference, but we're into decorating, so I added currants for eyes and buttons before baking, and then piped on icing for a pretty Christmas effect.

Gingerbread Making


Gingerbread Men
1 1/4 cups whole wheat flour
1 cup whole wheat pastry flour
3 teaspoons ground ginger
2 teaspoons cinnamon
1/2 teaspoon all spice
1/2 teaspoon nutmeg
1/2 teaspoon ground cloves
1/2 teaspoon baking powder
1/4 teaspoon baking soda
1/4 teaspoon salt
1/2 cup packed brown sugar
3 tablespoons unsalted butter, softened
1/2 cup molasses
1 egg

Icing (optional)
2 cups powdered sugar
1/4 teaspoon vanilla extract
3-4 tablespoons water


In a medium bowl whisk together flours, spices, baking powder, baking soda, and salt.

In a larger bowl, combine sugar and butter, and beat on medium speed for 2-3 minutes until fluffy. Add molasses and egg, blend. Add flour mixture, a little at a time, to the molasses mixture. Beat on low until blended. Divide dough in half, shape each into a disk, and wrap in plastic. Chill for at least 2 hours.

Preheat oven to 350

On a lighty floured surface, roll dough into a 1/4-inch thick round. Cut with desired cookie cutters, and place 1-inch apart on a greased cookie sheet (this is when I put the currants on mine). Bake for 7-8 minutes. Let cool on sheet for a couple minutes, then transfer to a rack to cool completely.

Icing: Combine sugar and extract. Mix in water one tablespoon at a time, until you reach your desired consistency. Pour into a zip-lock bag, and trim a tiny bit off the corner of the bag. Pipe icing onto cookies however you wish.

12.10.2008

Caramelized Onion Bread

Balsamic Caramelized Onions

Did You Know? Egyptians believed onions had strength-producing powers, therefore, they were fed to laborers who built the pyramids.

Caramelized onions have a way of making everything better. Compared to their raw counterpart, the sweetness that emerges after being slowly sauteed, you wouldn't even think that they came from the same vegetable. I made this bread for the first time on election day, and used it to make amazing grilled cheese sandwiches. My family and I (along with a few friends) finished the entire loaf that night, and the loaf is pretty substantial. My brother told me that I should be making bread like this every week.


Caramelized Onion Bread Duo

It has since become a recipe I turn to time and time again. We have a weekend tradition at my house of cooking breakfast together on Sunday mornings, and it is one of my favorite things to do. This particular bread has won a starring role on our Sunday morning table, and is absolutely delicious toasted and served alongside eggs. Although Nicole's recipe over at Baking Bites is perfect just as it is, I think the addition of caraway seeds or some rye flour would be excellent also.

Caramelized Onion Bread
2 Vidalia onions, thinly sliced
2 tablespoons olive oil
Balsamic vinegar (a few splashes)
1 tablespoon active dry yeast
1 tablespoon sugar
1 1/2 cups warm water (100-110F)
4-5 cups bread flour
1/4 teaspoon freshly ground pepper
1 tablespoon salt

Heat oil in a large skillet over medium-high heat. Add onions and saute until translucent. Lower the heat a bit and continue to cook until the onions are a golden brown and caramelized all over. I add a few splashes of balsamic vinegar - it really enhances the sweetness, and gives the onions a deep mahogany color. The whole process takes about 45 minutes. Cool to room temperature.

In a large mixing bowl, combine yeast, sugar and 1/4 cup water. Stir to dissolve and let sit until yeast is foamy, about 5 minutes. Pour in remaining water and 3 cups bread flour, mix well. Add onions, pepper, salt and another cup of flour and stir again. Add remaining flour gradually until dough comes together into an elastic ball. Turn dough out onto a lightly floured surface and knead until smooth and elastic, about 10 minutes. Place dough in a lightly oiled bowl, cover with plastic wrap, and let rise unil doubled in size, about 1 hour.

Preheat oven to 350

Lightly grease a 10-inch tube pan with cooking spray. Gently deflate risen dough on a lightly floured surface, press a hole in the center of it (like a huge bagel), and place in the tube pan. Cover, and let rise another 45-60 minutes.

When bread is finished rising, bake for 45 minutes, until golden.

Turn loaf out of pan onto a cooling rack to cool to room temperature before slicing. Enjoy as part of your favorite sandwich, as morning toast, or just plain sliced, it's really that good (my favorite way to eat this is toasted alongside fried eggs).

*Make Ahead Tip: I often prepare the caramelized onions a day or two in advance, refrigerate them, and then microwave them for 20 seconds when ready to make the bread (just to get the chill off).*


12.07.2008

Roasted Broccoli & Walnut Pasta

Roasted Broccoli & Walnut Pasta

Did You Know? Noodles got their start in China, not Italy as many people might think.

I spent this weekend in my kitchen, cooking some meals for my sister who was home from school for the weekend. I thought she could use a break from all that cafeteria food. After a delicious Friday night of baking with my mom while watching one of our favorite movies, Pride and Prejudice, I thought we could use a nice healthy lunch on Saturday afternoon. The recipe I turned to is one I make a lot, for it incorporates some of my favorite flavors, cranberries and walnuts (you've probably noticed that I add them to just about everything).

Roasted Broccoli & Walnut Pasta in the Making

The colors of this pasta dish are absolutely beautiful. The bright red, whites, and greens would make a lovely vegetarian addition to your holiday meal (I've already promised my sister I would make this for her on Christmas). This recipe is delicious warm, as it wilts the spinach below. But I also like to serve it cold, and replace the parmesan with some crumbly feta, and tossed with baby spinach - a perfect summer pasta salad. I'll leave you with the recipe, as I leave to watch Pride and Prejudice for the tenth time this weekend...

Roasted Broccoli & Walnut Pasta
1 bunch broccoli, chopped
1 head cauliflower, chopped
Olive Oil
Salt and Pepper
2 sweet onions, thinly sliced
Handful of walnuts, toasted and chopped, plus some for garnish
1 lb. campanelle pasta (or whichever shape you prefer)
Handful of dried cranberries, plus some for garnish
1/2 cup Parmigiano-Reggiano, grated, plus some for garnish
Balsamic Vinegar
6 oz. baby spinach, washed and dried

Preheat oven to 400 degrees. Toss broccoli and cauliflower with a few splashes of olive oil, salt and pepper, and roast for about 30 minutes, tossing halfway through.

Meanwhile, cook your pasta in a large pot of boiling water, and start your onions. Heat a few splashes of olive oil in a large skillet, and saute the onions until transluscent. Turn the heat down a bit, season the onions with salt and pepper, and continue to cook until they are lightly caramelized, another twenty minutes or so.

While your pasta cooks, place the cranberries in a bowl and add about a half cup of the pasta water to plump them up a bit while you continue to assemble the meal.

When the pasta is al dente, remove another half cup or so of the pasta water to add back to the dish, before you drain it. Drain the pasta, put it back in the pot on the stove, and add the roasted broccoli, cauliflower, onions, cranberries, walnuts, parmesan, and some salt and pepper to taste. Moisten with the additional pasta water, a good drizzle of olive oil, and a few splashes of balsamic vinegar. Toss to combine, while the heat of the stove melts the cheese and melds the flavors.

Place the washed spinach on your serving platter, and top with the hot pasta. Garnish with additional cranberries, walnuts, and parmesan, and enjoy!


12.04.2008

Toasted Pecan Pie

Pecan Pie

Did You Know? There are over 1,000 varieties of pecans. Many are named for Native American Indian tribes, including Cheyenne, Mohawk, Sioux, Choctaw and Shawnee.

I promise I don't just sit around all day eating pie! I just loved how my Thanksgiving pies turned out, so I wanted to share. After this one, I swear I won't post another pie for a while. If you're like me, then you love cooking and baking for others...so just because you make all these sweets, doesn't mean you have to eat them all yourself! Share the love, your neighbors will be so grateful. Now, on to the pie...

If you asked my family for the one thing they didn't get enough of on Thanksgiving, it would be the pecan pie. My mom was the first to cut in, when I gave in and let her have a slice before the big day. It was all downhill from there. That pie didn't last 20 minutes once the desserts were set out after dinner. I blame myself for not cutting in earlier. I fell asleep after dinner, and when I woke up for dessert, there was a tiny sliver left for me to taste. Looks like I'll be making two of these next year, and thanks Pioneer Woman for the quickly consumed recipe...


Pecan Pie Duo

Don't forget to toast the pecans lightly. It's a step I added, but it really makes all the difference between a chewy and crunchy topping.


Pecan Pie
1 unbaked pie crust (I used Pate Brisee-I cut the dough round for the top into strips, and braided them together. Stick it to the dough in the pie plate with an egg wash)
1 cup white sugar
2 tablespoons brown sugar
1/4 teaspoon salt
1 cup corn syrup
1/3 cup melted butter (regular, salted)
3 eggs, beaten
1/4 teaspoon vanilla
1 heaping cup chopped pecans, toasted for about 5 minutes


Roll out your bottom dough round on a lightly floured surface, and place into a 9-inch pie plate, freeze until firm, about 30 minutes (I added the braid to the top before I froze it).

Mix sugar, brown sugar, salt, corn syrup, butter, eggs, and vanilla together in a bowl. Pour chopped pecans in the bottom of the pie shell. Pour syrup mixture over the top. Bake pie at 350 degrees for 1 hour, being careful not to burn pecans and crust.

The pie will be jiggly when you remove it, don't worry, it will set as it cools. Best to eat this one the next day.


Pecan Pie Baking

12.03.2008

Apple Pie

Apple Pie

Did You Know? In rural homes in the 19th century, apple, and other fruit pies were often served for breakfast, and considered a good hearty beginning for a hard day's work.

My sister and I often laugh at her undying love of food. So when I asked her what she wanted me to make for her on Thanksgiving, she said "anything...as long as this apple pie is on the menu." I, on the other hand, was always an apple crisp fan, until I ate this. Trust me, this is by far the best apple pie you will ever make. And of course, it's courtesy of the ultimate, Martha Stewart...


Apple Pie

I decorated my crust with maple leafs that I cutout of some extra dough I had from all those pies I had been making for the holidays, but it's just as good decoration-free (although the oohs and aahs you get just won't be the same).

Apple Pie
5 tablespoons all-purpose flour, plus more for work surface
Pate Brisee
1 large egg yolk
1 tablespoon heavy cream
4 pounds assorted cooking apples, peeled, cored, and cut into 1/4-to 1/2-inch-thick slices (I used 6 large ones - honeycrisp, golden delicious, and macintosh)
Juice of one large lemon
1/2 cup granulated sugar
1/4 teaspoons ground cinnamon
1/4 teaspoon ground nutmeg
1/4 teaspoon salt
1/4 cup cold (1/2 stick) unsalted butter, ,cut into 1/2-inch pieces
Sanding sugar, for sprinkling


Turn out 1 piece of dough onto a lightly floured work surface. Roll into a 13-inch round, about 1/8 inch thick. Fit into 9-inch pie plate. Trim edges flush with rim. Freeze until firm, about 30 minutes.

Roll out remaining dough on parchment paper to a 13-inch round, about 1/8 inch thick. Transfer to a baking sheet, and refrigerate until firm, about 30 minutes.

Preheat oven to 400 degrees. Whisk egg yolk and cream in a small bowl; set egg wash aside. Put apples, lemon juice, granulated sugar, flour, cinnamon, nutmeg, and salt in a large bowl; toss to combine. Fill pie shell with apple mixture, and dot with butter. Lightly brush edge of pie with a wet pastry brush. Place dough round on top of pie. Trim edges flush with rim; press to seal. Crimp edges as desired. Make four 1/2-inch slits in center of pie. Brush top with egg wash; sprinkle with sanding sugar. Freeze 30 minutes.

Place pie on a baking sheet. Bake until crust begins to turn golden brown, about 20 minutes. Reduce oven temperature to 350 degrees. Bake until crust is golden brown and juices are bubbling, about 35 minutes. Cover with foil if browning too quickly. Let cool completely on a rack.

This pie is best the next day, when the apples have had the chance to set.


12.01.2008

Thanksgiving Leftovers

Cranberry Yogurt

Did You Know? It was not until 1941, that congress declared Thanksgiving as a national holiday.

I said I would share a few tips or suggestions for all those Thanksgiving leftovers, so here's some recipes that my family loves...

-Turkey and Cranberry Quesadillas
-Butternut Squash Soup, thin out my squash recipe with some broth
-Turkey Soup (and don't forget any extra gravy or stuffing-according to my mom)
-Cranberry Yogurt: yogurt w/ cranberry sauce mixed in and topped with toasted walnuts (pictured above)
-Pumpkin Pie Oatmeal: cooked oats, roasted pumpkin puree, toasted pumpkin seeds, dried cranberries, brown sugar, pumpkin pie spice (pictured below)...

Pumpkin Pie Oatmeal

-Toss leftover veggies (brussels sprouts, carrots, string beans) and stuffing with some rice or pasta and bake with a little parmesan cheese on top
-Potato or Squash Pancakes
-Add a few eggs to a mixture of stuffing, squash, finely chopped veggies, cranberry sauce, etc., and make your own Thanksgiving Veggie Burger

Be creative, almost anything goes with these versatile flavors!


Back to Top