4.29.2009

Peanut Butter & Jelly Bars

Peanut Butter & Jelly Bars

Did You Know? The world's largest peanut butter and jelly sandwich was created in Oklahoma City, OK, on September 7, 2002 by the Oklahoma Peanut Commission and the Oklahoma Wheat Commission. The PB & J sandwich weighed in at nearly 900 pounds, and contained 350 pounds of peanut butter and 144 pounds of jelly. The amount of bread used to create the sandwich was equivalent to more than 400-one pound loaves of bread.

I don't know if I ever mentioned this before, but when my best friend Chris came home from a semester in New Zealand last Summer, his teaching goals had somehow evolved into a baking career. And apparently I was to be his business partner. So ever since then, we've pretty much been all talk. We came up with a name for our bakery, Sweet Inspirations (Chris is a Philosophy Major), are working on a logo (thanks Jeff), we have this little website of mine, but we hadn't actually baked anything together...until now.

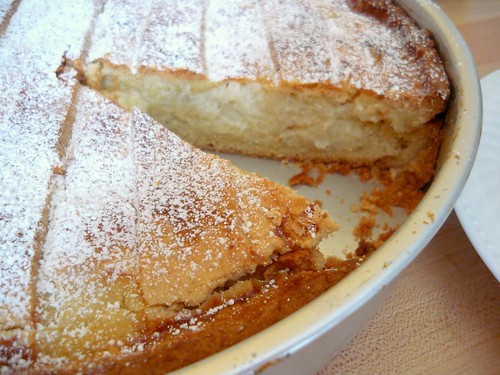
I have been meaning to make these bars ever since I saw them on Martha Stewart. Peanut butter and jelly has always been my favorite flavor combination, although the PB has been put on the back burner for my preference for almond butter. But that's besides the point. Any nut butter mixed with a fruity jam is an unstoppable combo. Throw in some butter and sugar and turn it into a bar-type cookie, and I'm in PB & J heaven.


Peanut Butter & Jelly Bars

Peanut Butter & Jelly Bars

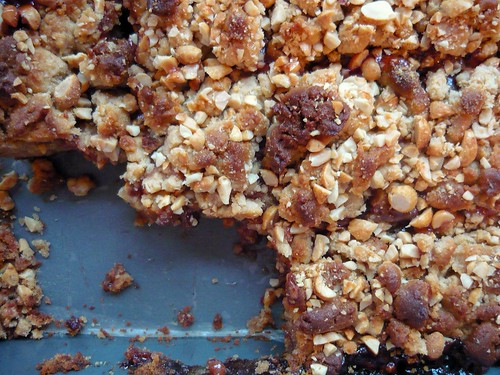
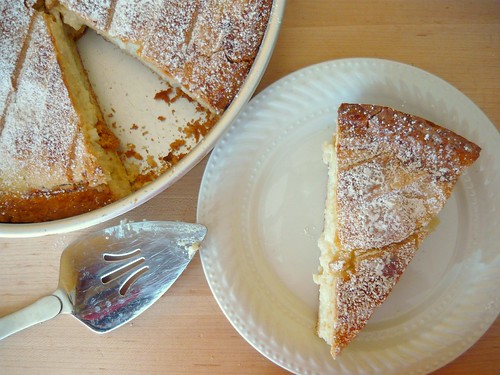
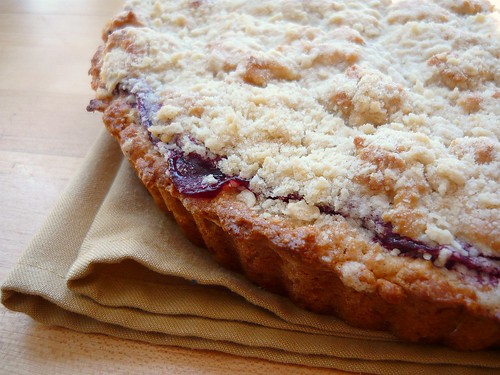
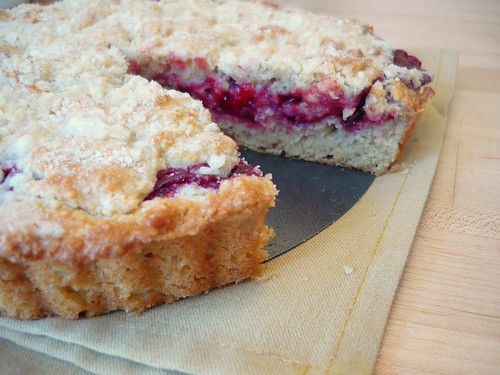
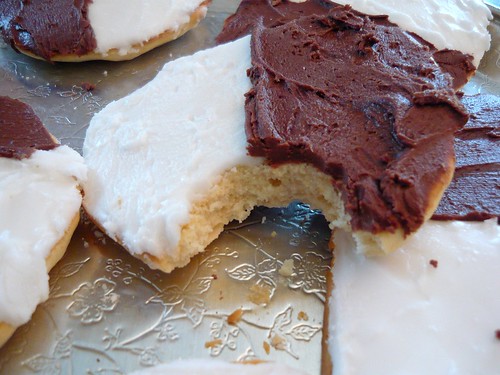
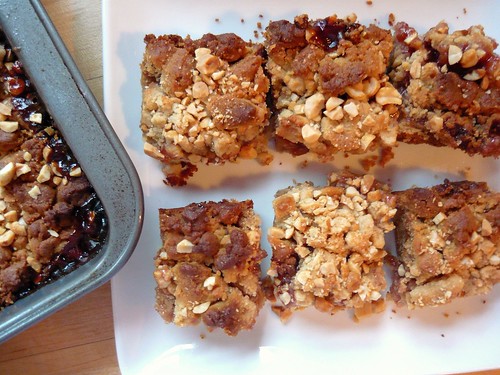
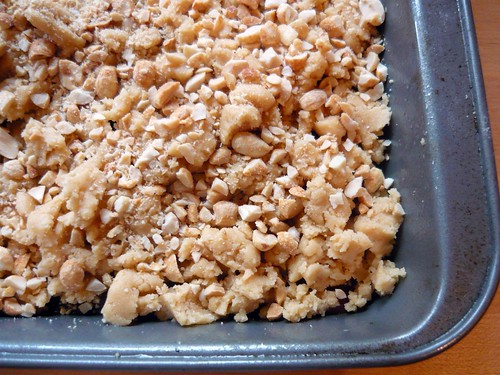
We made these so that Chris would have something to present to his family for Easter a few Sundays ago. We're always talking about the bakery with them, convincing our future investors that we'd make a great investment, so we thought it was about time to show them what we're all about. The sticky-sweet jam sandwiched between peanut-buttery shortbread brought the classic lunchbox staple to new levels. Sprinkled with roasted peanut pieces, this bar was the ultimate in sweet and salty. Although we couldn't help but to try a piece straight out of the oven, I'd recommend letting them cool before slicing. The warm pieces sort of slid apart, but the oozing peanut butter and jam was something I just couldn't wait to dive into.

Peanut Butter & Jelly Bars

Peanut Butter & Jelly Bars

I'm known for "healthing" up a lot of the recipes I make, so I can't wait to try some more variations on these. I wanted to keep this first go from the book, so we followed Martha's suggestions to the T. I'd love to do an almond butter and banana version or maybe almond butter and fig jam. Ashley from Sweet & Natural did an awesome job using more wholsesome ingredients when she conquered these bars, too. I'd better go write some of these ideas down before I forget...Enjoy!


Peanut Butter & Jelly Bars
Adapted from Martha Stewart's Holiday Cookies 2001

1 cup (2 sticks) unsalted butter, room temperature, plus more for pan
3 cups all-purpose flour, plus more for pan
1 1/2 cups sugar
2 large eggs
2 1/2 cups smooth peanut butter
1 1/2 teaspoons salt
1 teaspoon baking powder
1 teaspoon pure vanilla extract
1 1/2 cups strawberry jam, or other flavor
2/3 cup salted peanuts, roughly chopped

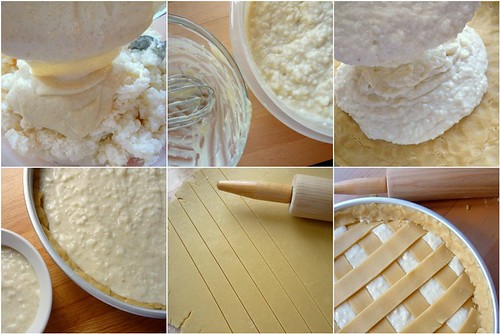
Heat oven to 350 degrees. Grease a 9-by-13-inch pan with butter, and line the bottom with parchment paper. Grease the parchment, and coat inside of pan with flour; set aside.

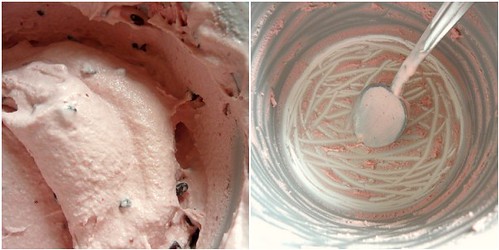
Place butter and sugar in the bowl of an electric mixer fitted with the paddle attachment. Beat on medium-high speed until fluffy, about 2 minutes. On medium speed, add eggs and peanut butter; beat until combined, about 2 minutes.

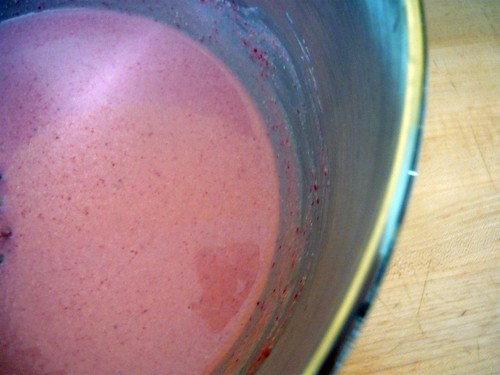
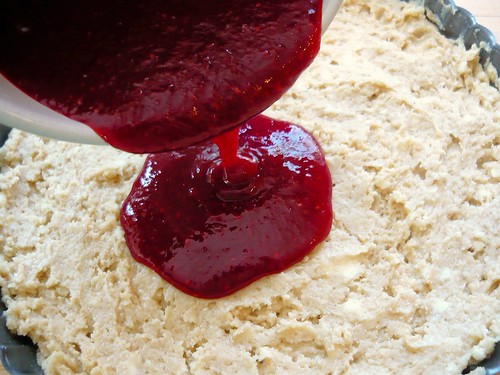
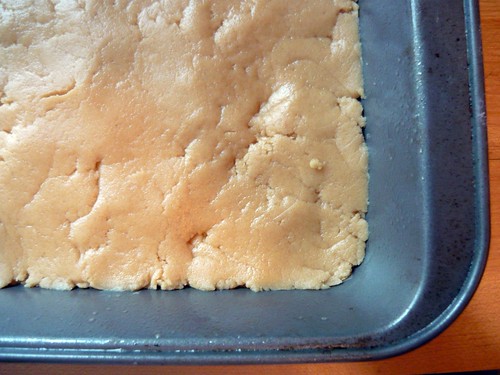
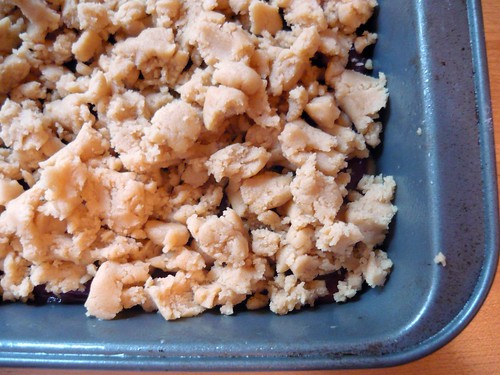
Whisk together salt, baking powder, and flour. Add to bowl of mixer on low speed; combine. Add vanilla. Transfer two-thirds of mixture to prepared pan; spread evenly with offset spatula. Using offset spatula, spread jam on top of peanut-butter mixture. Dollop remaining third of peanut-butter mixture on top of jam. Sprinkle with peanuts.

Bake until golden, about 40-45 minutes. Transfer to a wire rack to cool; cut into about thirty-six 1 1/2-by-2-inch pieces.

Peanut Butter & Jelly Bars

Peanut Butter & Jelly Bars

4.25.2009

POM-Berry Chip Ice Cream

POM-Berry Chip Ice Cream

Did You Know? Man first began planting pomegranate trees sometime between 4000 and 3000 B.C. Many scholars now suggest that it was the pomegranate, not an apple, depicted in the biblical Garden of Edan.

I was recently contacted by POM Wonderful with the request of sampling some of their 100% pomegranate juice to feature here on Buff Chickpea. Being a huge fan of their products anyways, I was thrilled to get a case free of charge. Being the only brand guaranteed to contain 100% authentic pomegranate juice, POM Wonderful has always been the only bottle I look towards at the grocery store. And besides being packaged in a wonderfully curvy and creative bottle, the health benefits of this tart juice are amazing. Backed by $25 million in medical research, POM Wonderful contains no added sugars, preservatives, colors, or fillers. It has been shown to improve cardiovascular and prostate health, as well as being a fantastic source of antioxidants.


POM-Berry Chip Ice Cream

POM-Berry Chip Ice Cream

But what to do with all these bottles? My ice cream maker has basically sat in my freezer ever since I got it back in December, and I've been really wanting to start experimenting and perfecting my technique. The weather has been pretty miserable up until now, so the timing of their delivery was pretty perfect. The weather is warming, the sun is shining, and cookouts are bound to make a regular appearance on my back deck. To me, there's nothing that says Summer more than an ice cream cone. Soft serve or hard, jimmies or sprinkles, studded with candy or dipped into a crunch coat, the possibilities of add ons are about as lengthy as the flavors themselves. And there's definitely no better way to end a humid day at the beach than waiting in a never-ending line at your favorite parlor. I love ice cream, and I hope you do to.

POM-Berry Chip Ice Cream

POM-Berry Chip Ice Cream

The whole process of churning ice cream is pretty amazing to me. I mean you pour in some custardy-liquid and about 20 minutes later you have a bucket full of creamy, frozen goodness. And the result of my final creation was everything I could have hoped for. Sweet and tart, and studded with mini-chocolate chips, this was the freshest ice cream I've ever tasted. I definitely recommend consuming this the day it's churned, but I added some limoncello to keep it from freezing solid just in case we couldn't. And not to worry, it was still good a few days later, just not as creamy as day one. I was thinking of starting some sort of ice cream feature on Buff Chickpea when the weather warms up a little more permanently. So let me know what you think, and what your favorite flavors are. Enjoy your weekend!


POM-Berry Chip Ice Cream

1 cup whole milk
3/4 cups heavy cream
4 strips fresh lemon zest
1/8 teaspoon salt
2 large eggs, plus 2 egg yolks
3/4 cup sugar, divided
1/2 lb strawberries, trimmed and quartered
8 oz. POM Wonderful 100% pomegranate juice
2 tablespoons limoncello liquor
3/4 cup mini-chocolate chips

Combine milk, cream, zest, and salt in a heavy saucepan and bring just to a boil. Remove from heat and discard zest.

Whisk eggs and yolks with 1/2 cup sugar in a bowl, then add hot cream in a slow stream, whisking. Pour back into saucepan and cook over moderately low heat, stirring constantly, until slightly thickened and coats the back of a spoon.

Immediately pour custard through a fine sieve into a metal bowl, then cool to room temperature, stirring occasionally. Chill, overed, at least until cold, about 2 hours, and up to 1 day.

While custard is chilling, purée strawberries in a blender with remaining 1/4 cup sugar, pomegranate juice, and limincello until smooth. Force through fine sieve to remove seeds and any pulp. Stir purée into custard.

Freeze in ice-cream maker. Fold in the chocolate chips after churning. Transfer to an airtight container and put in freezer to harden up a bit.

POM-Berry Chip Ice Cream

4.21.2009

Tomato, Feta, & Barley Salad

Tomato, Feta, & Barley Salad

Did You Know? Barley played an important role in ancient Greek culture as a staple bread-making grain as well as an important food for athletes, who attributed much of their strength to their barley-containing training diets. Gladiators were even known as hordearii, which means "eaters of barley."

One more dish before we put Easter away until next Spring. This barley salad was my favorite addition to our lunch on Sunday. The original recipe called for orzo, but that didn't seem hearty enough for me, nor very flavorful. My fondness of barley's texture and chewiness won over, and I used this favorite grain of mine once more in a lovely salad of sorts.

Besides being wonderfully nutty, barley also packs quite the nutritional punch. Unlike your average pasta or white rice, barley delivers over half of your %DV of fiber and selenium per one cup serving, as well as being a good source of phosphorous, copper, and manganese. Racking up benefits like protection against cardiovascular disease, free radicals, atherosclerosis, and type 2 diabetes, barley is a nutritious whole grain you surely want to incorporate into your diet.


Green Onions

Besides the barley, the ingredients backing it up are in no way lacking nutritionally either. Full of juicy tomatoes, creamy feta, and spicy green onions, the whole salad comes together with a wonderful honey-sweetened vinaigrette. You'll have some extra dressing after tossing the barley, so just throw it in the fridge to flavor your salads and veggies for the next couple days (which is about how long it will last). Enjoy!
Tomato, Feta, & Barley Salad

Tomato, Feta, & Barley Salad
Adapted from Bon Appetit via Epicurious

3 tablespoons red wine vinegar
3 tablespoons fresh lemon juice
1 teaspoon honey
1/2 cup olive oil

4 cups vegetable broth
1 1/2 cups barley
2 cups grape tomatoes, halved
1 7-ounce package feta cheese, crumbled (about 1 1/2 cups)
1 cup chopped fresh basil
1 cup chopped green onions
1/2 cup toasted, slivered almonds


Rinse barley, and place in a small bowl. Cover with water by about two inches, and let soak for about an hour. Drain.

Whisk vinegar, lemon juice, and honey in small bowl. Gradually whisk in oil. Season vinaigrette with salt and pepper. (Can be made 2 days ahead. Cover and chill.)

Bring broth and 1/2 cup water to a boil in a large heavy saucepan. Stir in barley, reduce heat, cover, and boil until tender but still firm to bite, about 20 minutes. Drain. Transfer to large wide bowl, tossing frequently until cool.

Mix tomatoes, feta, basil, green onions, and almonds into barley. Add vinaigrette (I used about half); toss to coat. Season with salt and pepper. (Can be made 2 hours ahead. Let stand at room temperature.) Serve at room temperature.

4.17.2009

Pecorino-Roasted Fennel & Carrots

Pecorino-Roasted Fennel & Carrots

Did You Know? A one cup serving of fennel provides one third of the Recommended Daily Intake (RDI) of vitamin A and one half of the RDI of vitamin C. Fennel also provides 15-20% of the RDI of calcium and iron.

Continuing with the Easter theme, this recipe was a delicious addition to our lunch last Sunday. Not being in control of the main dish gave me free reign with the side dishes, and lot more time to focus on that pie I made. It was a lot less stressful knowing that my Mom had the ham under control. And although I have a problem with needing to do everything on my own and just my way, I think I might have to take this 'group-effort' approach again.

I love what the roasting process does to vegetables, especially fennel. The subtleties it brings to the sometimes potent anise flavor is delicious. Playing off the sweetness of the carrots, these two are a match made in heaven. Crusted to a golden brown, the salty pecorino adds yet another layer of depth. Sprinkling the top with kelly green fronds give this dish quite the appeal for such an easy side. Enjoy!


Pecorino-Roasted Fennel & Carrots

Pecorino-Roasted Fennel & Carrots
Adapted from Bon Appetit via Epicurious

3-4 fennel bulbs, cored, and sliced horizontally, plus 2 teaspoons chopped fronds
3-4 large carrots, peeled, cut diagonally into 1/3-inch-thick slices
2 teaspoons Herbes de Provence
1/2 cup grated pecorino cheese
1/3 cup extra-virgin olive oil

Preheat oven to 375°F. Lightly oil 13x9-inch baking dish. Layer sliced fennel and carrots in dish, sprinkling layers with salt and pepper. Sprinkle with Herbes, then cheese. Drizzle with oil. Bake until vegetables are tender and top is golden brown, about 1 1/4 hours. Sprinkle with fronds, and serve.


4.13.2009

Neopolitan Easter Pie

Neopolitan Easter Pie

Did You Know? Easter Pie has many different names and even more recipes, depending on the section of Italy in question. In Naples it is known as "pastiera," and is made with ricotta cheese and whole grains of wheat to symbolize rebirth.

After a cold and rainy Saturday, the weather finally cleared up to allow for a beautiful Sunday lunch. After a late night of preparations Saturday, I got up early with my Mom and continued the endless mixing, chopping, and roasting. Things went pretty smoothly, and in the end, our kitchen table looked beautiful, and tasted even better. Which brings us to today, and the beginning of an Easter recap. Starting with dessert, I'll post a few other dishes my family enjoyed throughout the week.

Wanting to include a traditional Easter dish, I remembered this Neopolitan pie that was featured on The Martha Stewart Show a few years back. My family has always loved Italian foods, and this sounded like an interesting take on a ricotta pie, a dessert we can't get enough of. The idea of incorporating arborio rice brought about thoughts of a sweet risotto or a tapioca style pudding. Both of which would make for a wonderfully creamy filling between a flaky crust. I researched a few other takes on this classic Italian pie, and came up with something I know will be made again come next Spring.


Neopolitan Easter Pie

I let the pie cool to room temperature, mainly for slicing reasons, but I'm sure this would be good both warm or cold. Unlike the cannoli-like filling of my previous ricotta pies, this Neopolitan style dessert was a lot less grainy. The pastry cream added such an intense vanilla richness, and the specks of beans do a great job at making any dessert look gourmet. I was never a fan of tapioca pudding, so what comes to my mind is more of a risotto style pie, sandwiched between a flaky, sugary crust, and dusted with a powder of confectioners sugar. I'd never had orange blossom water, but I read that it was pretty traditional, so I tossed some in. It added such delicate floral undertones, and just a hint of sweet orange flavor. In fact, the only thing that I had a bit of trouble with on this pie was the crust. It called for a sweet dough, combining quite a bit of flour with butter, sugar, and eggs. If I were to make it again, I'd definitely use my stand-by pate brisee. The sweet dough was terribly crumbly, and I ended up just pressing it into the bottom and up the sides of the cake pan. I knew it would fall apart if I tried to interlock the top ribbons of dough, so I made sort of a faux-lattice top. In the end, it looked wonderful, and confectioners sugar does a beautiful job at hiding any imperfections.

Neopolitan Easter Pie


Neopolitan Easter Pie
Adapted from The Martha Stewart Show

1/2 cup arborio rice
2 cups milk
2 tablespoons unsalted butter
Pinch of salt
12 ounces whole-milk ricotta (about 1 1/2 cups)
3/4 cup sugar
2 tablespoons orange blossom water
Pastry Cream (recipe follows)
Sweet Dough (recipe follows)
All-purpose flour, for work surface
1 large egg, lightly beaten, for egg wash

Place rice in a medium bowl. Add enough water to cover by 2 inches. Refrigerate overnight.

The next morning, drain rice, and transfer to a medium saucepan. Add milk, 1 cup water, butter, and salt. Bring to a boil. Reduce to a simmer, and cook until tender, about 1 hour. Drain, and spread on a baking sheet. Let cool, about 20 minutes.

Preheat oven to 375 degrees. In a medium bowl, stir together ricotta and sugar. Add cooled wheat, pastry cream, and orange blossom water. Stir to combine.

Remove the larger piece of dough from refrigerator. On a lightly floured surface, roll into a 16-inch circle, about 1/8 inch thick. Fit into a 12-by-2-inch cake pan. Pour filling into the crust; set aside. On a lightly floured surface, roll out remaining piece of dough, 1/8-inch-thick. Cut into 3/4-inch lattice strips. Weave the lattice strips over the filling, pinching edges to seal. Crimp edges as desired.

Brush top of pie evenly with egg wash. Transfer to oven, and bake, rotating halfway through, until crust is golden and filling is bubbling, 1 to 1 1/2 hours.


Pastry Cream
3 large egg yolks
1/2 cup all-purpose flour
6 tablespoons sugar
2 cups whole milk
1 vanilla bean, split and scraped
Pinch of salt

Prepare an ice bath; set aside. In a medium bowl, whisk together egg yolks, flour, and sugar; set aside. In a medium saucepan over medium-high heat, combine milk, vanilla bean, and salt. Bring just to a boil.

Using a measuring cup or a ladle, slowly pour about 1 cup of the hot milk mixture into the egg-yolk mixture, whisking constantly. Pour mixture back into saucepan, and cook over low heat, stirring constantly with a wooden spoon, until thick 1 to 2 minutes.

Strain through a fine mesh sieve into a medium bowl set over the ice bath. Let stand, stirring occasionally, until cool. Place a piece of plastic wrap directly on the surface of the pastry cream. Transfer to refrigerator until cold, at least 1 hour, and up to overnight. Just before using, remove from refrigerator, and whisk to soften slightly.

Makes about 2 1/2 cups.


Sweet Dough
1 1/2 pounds (just under 5 cups) all-purpose flour
2 teaspoons baking powder
1 pinch of salt
1 cup (2 sticks) unsalted butter, room temperature
1 cup sugar
3 large eggs

In a medium bowl, whisk together flour, baking powder, and salt; set aside.

In the bowl of an electric mixer fitted with the paddle attachment, beat the butter and sugar on medium speed until light and fluffy, about 2 minutes. Add the eggs, one at a time, beating until fully incorporated after each addition.

Reduce speed to low, and beat in the dry ingredients. Turn the dough out onto a work surface. Divide dough, making sure one piece is slightly larger than the other. Place each piece of dough on a sheet of plastic wrap. Flatten, to form two discs. Wrap, and refrigerate at least 1 hour before using.

Neopolitan Easter Pie

4.12.2009

Happy Easter!

Tulips


I'll be back with a recipe tomorrow...

4.09.2009

Raspberry-Swirl Tea Cake

Raspberry Swirl Tea Cake

Did You Know? Red raspberries are native to Europe and have been cultivated for over 400 years, while wild red raspberries are native to North America. More than 40 varieties of raspberries were known by 1867, and today there are more than 200 known species.

Although they've been few and far between, the momentary breaks from rain and snow have brought about a craving for jam-filled cakes and whimsical, fruit-laden desserts. This recipe comes from one of my favorites, Inn Cuisine, where your hostess Sandie brings her love of all things bed and breakfast into the heart of her kitchen. Everything on her beautiful site has me daydreaming of lazy Summer weekends spent relaxing in a cozy cottage somewhere warm. If you haven't stopped by yet, I strongly encourage you to do so, if not for the pictures alone.

As the weather slowly warms, and the heavy meals hibernate until next winter, fruit takes its place on the forefront of our menus. I love putting the heavy chocolate dishes on the backburner, and whipping out the vanilla-scented crumbles and creams. Spring to me is the perfect time of year to experiment with fruity desserts. It's when your berry cravings begin to sprout, along with the first blooms of the season. The humidity isn't in full swing, and you have not yet sworn off your oven until Autumn returns. If not for the welcoming of Spring, this tea cake could at least make an appearance for your Easter Sunday brunch.


Raspberry Swirl Tea Cake

Like always, my family asked what I'd be making for them over the weekend, and I read off a list of possibilities. And like most weekends, my sister was skeptical. She doesn't like "jammy" things, and would prefer if I made something different. Of course I didn't really care, since I knew this one was not negotiable. And besides, I love proving her wrong.

Raspberry Swirl Tea Cake

Every step to making this cake was wonderful. The colors, the textures, and of course the flavors. Being a fan of anything pink, the ribbon of raspberry puree that ran through the center of the tart was beautiful. Dolloped with free-form mounds of buttery crumbles, the tea cake baked to a pale perfection in no time. I set it by the window to cool while we set off to do some errands on a gorgeous Sunday afternoon.

Raspberry Swirl Tea Cake


Raspberry-Swirl Tea Cake
Adapted from Inn Cuisine

Filling
1 (12 ounce) package frozen raspberries
1/4 cup granulated sugar
1 tablespoon cornstarch

Batter
1 & 1/4 cups all-purpose flour
1 cup whole wheat pastry flour
3/4 cup sugar
3/4 cup very cold butter, sliced into thin pats
1/2 teaspoon baking powder
1/2 teaspoon baking soda
1/8 teaspoon salt
1 egg
3/4 cup buttermilk
1/2 teaspoon vanilla extract
1/2 teaspoon almond extract


Preheat oven to 350 degrees F. Grease and flour a 10″ round tart pan with a removable bottom; set aside.

Raspberry Filling
In a heavy-bottomed saucepan, combine raspberries, sugar and cornstarch over medium heat; cook and stir until thickened and bubbly, 15-20 minutes. Remove from heat. Push raspberry mixture through a fine, mesh sieve, discarding seeds and pulp. Set filling aside to cool slightly. Alternatively, you may make ahead, store in an airtight container, and refrigerate and use within 3 days.

Tea Cake Batter
In a large mixing bowl, stir together flour and sugar. Using a pastry blender (I used a fork), cut in butter until the mixture resembles coarse crumbs. *Measure and set aside 1/2 cup of this flour-crumb mixture and reserve for crumb topping. To remaining flour mixture add baking powder, baking soda and salt; stir well to combine. Make a well in the center of flour mixture to accept the wet ingredients.

In a small mixing bowl, beat egg; stir in buttermilk, vanilla and almond extracts until just combined. Add all at once to the well you just created in the center of the flour mixture. Stir gently until just moistened; batter will be thick (do not overmix). Spread two-thirds of this batter over the bottom and up 1″ of the sides of prepared tart pan, using fingers to pat into place if necessary. Next, carefully spread the prepared raspberry filling on top of this batter. In small, irregular mounds, drop remaining batter on top of raspberry filling, spreading ever-so-gently with fingers or back of spoon if necessary. Allow mounds of batter to rest atop raspberry filling without pressing into bottom layer of batter. Sprinkle entire cake with the *reserved flour-crumb topping.

In the center of a preheated oven, bake tea cake for approximately 30-35 minutes or until a wooden toothpick inserted in center of cake comes out clean (filling will turn toothpick red). Remove tart pan from the oven and allow to cool on a wire rack for 15 minutes. Once cooled enough, remove cake from tart pan and place on cake stand or serving plate. Serve warm or at room temperature.

Raspberry Swirl Tea Cake

4.05.2009

Curried Chickpea Burgers

Curried Chickpea Burgers

Did You Know? In Britain the term "curry" has come to mean almost any Indian dish, whilst most people from the [Indian] sub-continent would say it is not a word they use. In India curry simply means "sauce." Therefore, Indian foods made with sauces are all "curries."

The last time I made veggie burgers, I promised to share my favorite variation on the original in the future. Having a soft spot for Thai and Indian flavors, I wanted to incorporate some of the ingredients those cultures tend to turn to. I had also just made a batch of Curried Cauliflower Soup, and the curry craving inside me was not completely satisfied.

I also needed to create a lunch alternative that could be made ahead of time, and was easy to throw together. Which is why I immediately thought to change up my favorite sandwich. Having classes scattered throughout the day, this burger freezes wonderfully, and is sauteed to a golden brown in no time, making it perfect for a busy school day.


Curried Chickpea Burgers

Spiked with red curry powder, ginger, and cilantro, the hint of sweet apple really does a wonderful job of rounding out the flavors. And like the previously mentioned, the crisp outside breaks open to a creamy chickpea center, studded with colors and flavors. Feel free to experiment with the ingredients. I can imagine lots of things would work here. Perhaps an Asian patty, with edamame, soy sauce, and ginger? Switching up the chickpeas and tossing in black beans instead. I'll be sure to post more combinations in the future. And if you have any favorites, let me know in the comments.

Curried Chickpea Burgers
Originally adapted from 101 Cookbooks

2 (15-oz) cans chickpeas, drained and rinsed
4 large eggs
1 medium apple, diced (I used golden delicious)
10-12 baby carrots (about 1/2 cup, grated)
1/2 tablespoon red curry powder
1/2 teaspoon fine-grain sea salt
1 cup alfalfa sprouts
1/3 cup chopped fresh cilantro
1 onion, chopped
1/2 teaspoon grated ginger
1/2 cup whole-grain bread crumbs
1/2 cup ground flax seed
1 tablespoon extra-virgin olive oil or cooking spray

Pulse the carrots in a food processor until finely grated. Add in the chickpeas, eggs, salt, and curry powder. Puree until the mixture is the consistency of a slightly chunky hummus. You don't want a smooth batter. Add the alfalfa sprouts, apple, and cilantro, and pulse a few more times just to combine. Pour into a mixing bowl and stir in the onion and ginger. Stir in the breadcrumbs and flax, and let sit for a couple of minutes so the crumbs can absorb some of the moisture.

Form the burger mixture into patties, and place on a parchment-lined baking sheet. I use an ice cream scoop for this to get around 15-18 small burgers. You can either freeze the patties (which is what I do, so I can have them whenever the mood strikes), or heat up that last tablespoon of oil in a skillet, and cook for a few minutes on each side, until nicely browned and heated through.

Slather with your favorite hummus, and sandwich between you grain of choice. Or try what a lot of others have recommended, and use the burgers as the bun, filling the inside with salad bar ingredients.


Curried Chickpea Burgers

Bloggers Blogging Bloggers

I wanted to ask all of you if you could hop on over to Dianasaur Dishes, and leave a comment on her latest post. Her brother Jason shares his love for ham and mustard sandwiches, and he is just too cute. I know leaving a comment would surely make his day, and pump him up for a future post!


4.01.2009

Black & White Cookies

Black & White Cookies

Did You Know? "Back in the day, black and white cookies were actually made by bakeries from their leftover cake batters, with just a little extra flour mixed in so the cookie didn’t spread all over the place. Sometimes called Amerikaner Cookies, they’re also occasionally referred to as "half-moons" Upstate and in New England. However, with a chocolate cake base, not the traditional vanilla/lemon one, they’re not the same thing..." Deb of Smitten Kitchen.

This next recipe comes from a favorite of both myself and Caitlin. Whenever we're in search of an authentic recipe, Smitten Kitchen usually finds itself to the screen in front of us. Ever since her last post, Caitlin has been researching recipes for her next. After a lunch break spent browsing through the archives of our beloved recipe journal, Cait decided these cookies would be our next baking endeavor together. These two-toned delights have always been a favorite of my brother's and her boyfriend's (one and the same), so we knew we had to get a great recipe to impress him by. After reading Deb's thoughtful post, we were convinced these were the real deal. And now that I think of it, my sister has always had a true fondness for these cookies. Although she likes to keep hers to a 100-calorie portion.


Black & White Cookies

We were unsure of what size scoop to go for with these cookies. We wanted a pretty traditional feel, so we knew they were going to be on the large size. After a few trials, we settled on the standard ice cream scoop. Flattening them out a bit after dropping them onto the sheets, we were pretty satisfied with the outcome. The lemon/vanilla base was just what we were hoping for, truly capturing the cakey texture that you would find in a bakery.


Black & White Cookies
Adapted from Smitten Kitchen

1 3/4 cups granulated sugar
1 cup unsalted butter (2 sticks), at room temperature
4 large eggs
1 1/2 cups milk
1/2 teaspoon vanilla extract
1/4 teaspoon lemon extract
2 1/2 cups cake flour
2 1/2 cups all-purpose flour
1/2 teaspoon baking powder
1/2 teaspoon salt
4 cups confectioners’ sugar (I used about 6)
1/3 to 1/2 cup water
3 ounces very bitter or unsweetened chocolate
1 teaspoon light corn syrup.
1 to 2 tablespoons unsweetened cocoa (optional)

Preheat oven to 375 degrees. Spray 2 baking sheets with nonstick spray, or line with parchment paper.

In large mixing bowl, combine sugar and butter. Mix by machine or hand until fluffy. Add eggs, milk and vanilla and lemon extracts, and mix until smooth.

In medium bowl, combine cake flour, all-purpose flour, baking powder and salt. Stir until mixed. Add dry mixture to the wet in batches, stirring well after each addition. Using an ice cream scoop, place heaping spoonfuls of the dough 2 inches apart on the baking sheets. Flatten slightly with a spoon. Bake until edges begin to brown, 8 to 12 minutes. Cool completely. *The original recipe says to bake for 18-20 minutes, but I found that far too long. Most of mine were in the oven for not even 10 and were perfectly pale gold at that point.

Boil a cup or so of water in a small pot. Place confectioners’ sugar in large, heat-safe mixing bowl. Gradually stir in enough boiling water to the sugar to make a thick, spreadable mixture. Err on the side of caution because a too-thin frosting is hard to undo. Leave remaining boiling water on the stove.

Flip the cookies over, and spread frosting on half of the flat side of each cookie. Once all cookie halves have been frosted, place the bowl of the remaining frosting over the hot water and bring it back to a simmer (creating a double-boiler). Stir in the bitter or unsweetened chocolate until melted, as well as the light corn syrup. At this point, if the chocolate frosting is not "black" enough, you may want to add a tablespoon or so of cocoa powder.

Ice the remaining half of the cookies with the chocolate frosting. If the frosting gets to dried out, whisk in an extra teaspoon of that hot water from time to smooth it back into a shiny frosting. I definitely didn't smooth my frosting out enough, as you can see in the photos. I ended up using probably double the amount of confectioners sugar, as we opted for a more caked on look.

*These cookies will last no more than a couple days, stored in an air-tight container. Their cakey texture goes stale much quicker than your average cookie.


Black & White Cookies

Bloggers Blogging Bloggers

Wanna Shred? Check out Too Buck to Blog
Into Vintage? Check out Madly Patch


Back to Top