2.27.2009

Cilantro-Jalapeno Hummus

Cilantro-Jalapeno Hummus

Did You Know? Last year, over 1,000 tons of hummus was eaten during Israeli Independance Day (Yom Haatzmaut). Of that thousand, 881 pounds was consumed out of a single, Guiness-Record sized plate.

It's hard to believe that this is my first hummus post on Buff Chickpea. I practically live off of it. Whether I'm dipping veggies, crackers, chips, a spoon, or my finger in it, I have to have hummus everyday, no joke. Whenever I am home from school, and for some strange reason there is no hummus left in the fridge (I call and ask Mom), I hit the grocery store before ending at my house.

I love how adaptible hummus (and most bean dips for that matter) is. If you master the basic puree, which isn't hard to master, you can add in flavors to suit your tastes. Be it roasted red peppers, tomato and basil, zesty lemon, roasted garlic, you name it, there is a hummus to show for it.


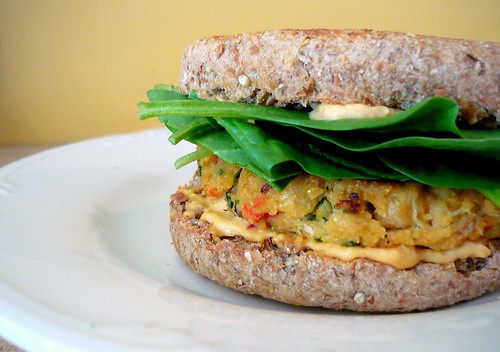
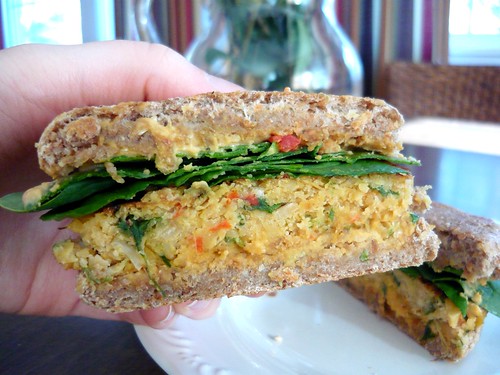
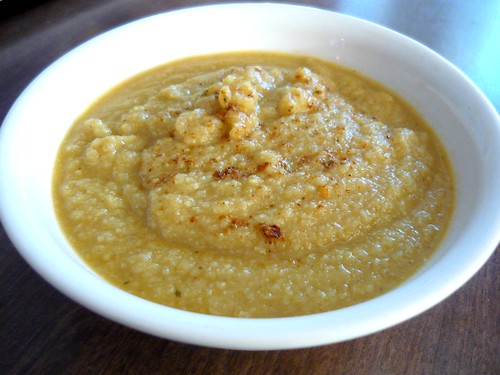
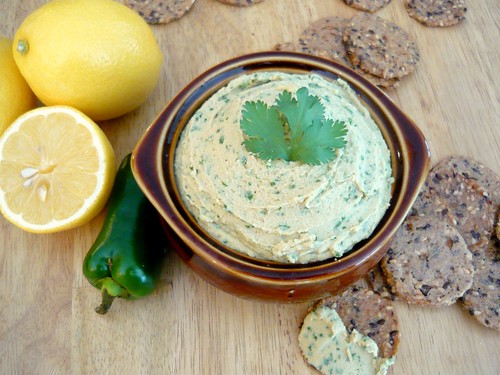
I've only very recently become smitten with cilantro. And now that my taste buds have warmed up, I've been adding it to everything. I bought an awesome three-layer hummus at Trader Joe's the other day, and one of the layers was cilantro-based. Hoping to recreate this new found fave, I pulled out my food processor, and gave it a go. The results were incredible! I don't know why I don't make homemade hummus more often, because this is definitely the way to eat it. Creamy, fresh, and spicy, and still warm, I was in hummus-heaven, if such a place exists. If your looking for a go-to hummus recipe, look no further, this is your one...


Cilantro-Jalapeno Hummus
I prefer the taste of cashew butter to tahini, but feel free to substitute

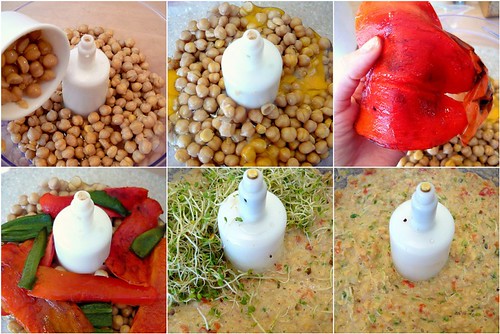
1 (15-oz) can of chickpeas
1 teaspoon sea salt
1 clove garlic
1/4 cup cashew butter
1/4 cup lemon juice (about 1 lemon)
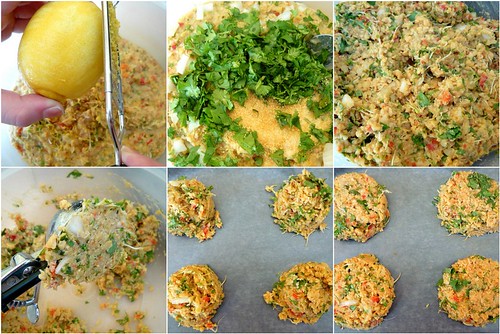
1/2 cup fresh cilantro
1 jalapeno, ribs and seeds removed
1-2 tablespoons cooking water*


Rinse and drain the chickpeas. Gently rub the skins off of the chickpeas with your hands (I like to remove all of them for a smoother consistency). Transfer the skinned chickpeas to a small saucepan, and cover them with water by an inch or so. Bring to a boil, reduce heat, and simmer for about 5-10 minutes, until the chickpeas are very soft. Drain, making sure to reserve a little of the cooking water.*

Add the cashew butter, lemon juice, salt and garlic to a food processor, and pulse for a couple of seconds to combine. Add the chickpeas, cilantro, and jalapeno, and process until smooth. If the hummus is on the dry side, add a tablespoon or two of cooking water (or more), until you reach your desired consistency (I like a real creamy hummus, but it only took me about 1 tablespoon of water). Scrape down the sides in between each tablespoon, and season with additional salt if needed.

Transfer to a bowl, and serve with veggies or pita chips. Or if your like me, eat directly from the food processor. It was so good nice and warm from the freshly simmered chickpeas.


2.23.2009

Roasted Pepper Veggie Burgers

Roasted Pepper Veggie Burgers

Did You Know? The white ribs inside a pepper that we all trim away actually contain heart healthful bioflavonoids, so use them in your soups!

This was one of the first things I made for my family when I started this blog, but unfortunately I don't have the pictures from our very first experience. Because if I did, you would see them on big, homemade kaiser rolls. I was so excited at how well those rolls turned out, but for some reason, I have yet to make them again. I'll save that for Spring Break, which will be here before I know it.

Besides the rolls, which definitely don't make or break this sandwich, the burgers have quickly become my go-to meal. Pre-Roasted Pepper Veggie Burgers, my diet consisted of a lot of store-bought, frozen patties (Gardenburger mostly). They were convenient, healthy, and pretty tasty, but I knew all of that sodium and TVP couldn't be the best thing in the world. When I came across Heidi's Ultimate Veggie Burger, I knew it had to be good, I mean is there anything on 101 Cookbooks that isn't?


Roasted Peppers

Serving her burger as the bun, it lent itself to a lot of different fillings, which she detailed wonderfully. Being a bread person, I knew I wanted to take some of her filling ideas, and experiment with adding them to the burger mixture itself. That way I would incorporate some extra veggies, add some more flavor, and plate the burger more traditionally, sandwiched between bread.

Roasted Pepper Veggie Burgers

The burgers are a breeze to throw together, and the taste is like nothing you will find in their manufactured counterpart. I love the depth that the roasted peppers bring, set-off by the brightness of the cilantro. The sauteed exterior develops a wonderful, golden crunch, split open to reveal a creamy, hummus-like filling.

Keeping the base mixture consistent with Heidi's recommendations, the flavor combinations for mix-ins are endless - all resulting in an entirely new burger. I've already come up with a new favorite version of this ultimate veggie burger that I can't wait to reveal to all of you in the future. Until then, here's my first take on Heidi's classic...


Roasted Pepper Veggie Burgers


Roasted Pepper Veggie Burger
2 (15-oz) cans chickpeas, drained and rinsed
4 large eggs
1 red bell pepper
2 jalapeno peppers
1/2 teaspoon fine-grain sea salt
1/3 cup chopped fresh cilantro
1 onion, chopped
Zest of one lemon
1 cup alfalfa sprouts
1/2 cup whole-grain bread crumbs
1/2 cup ground flax seed
1 tablespoon extra-virgin olive oil or cooking spray

Preheat oven to 450 degrees.

Place red and jalapeno peppers on a baking sheet, cut side down. Right before placing them in the oven, switch your oven over to broil. Broil for about 8-10 minutes, until charred on the outside.

Remove from the oven and place the peppers in a zip-lock bag. Seal the bag, and let steam for about 20-30 minutes. At this point, the skins can easily be peeled away, to leave you with the roasted peppers.

Combine the chickpeas, eggs, roasted peppers, and salt in a food processor. Puree until the mixture is the consistency of a slightly chunky hummus. You don't want a smooth batter. Add the alfalfa sprouts, and pulse a few more times just to combine. Pour into a mixing bowl and stir in the cilantro, onion, and zest. Stir in the breadcrumbs or flax, and let sit for a couple of minutes so the crumbs can absorb some of the moisture.

Form the burger mixture into patties, and place on a parchment-lined baking sheet. I use an ice cream scoop for this to get around 12-15 small burgers. You can either freeze the patties (which is what I do, so I can have them whenever the mood strikes), or heat up that last tablespoon of oil in a skillet, and cook for a few minutes on each side, until nicely browned and heated through.

I enjoy mine on a toasted Ezekial 4:9 Sprouted English Muffin, smeared with some red pepper hummus and topped with baby spinach leaves.


Roasted Pepper Veggie Burgers

2.19.2009

A Flan for Eddie

Eddie's Flan


Did You Know? The name "Flan" begins with a word in old French "flaon," which comes from the Latin "flado," meaning "custard." According to Platina's De Honesta Voluptate, an Italian cookery text published approximately 1475, custard-type dishes were considered health food. In addition to being nourishing, they were thought to soothe the chest, aid the kidneys and liver, increase fertility and eliminate certain urinary tract problems.

My Uncle Eddie has been one of my biggest fans of Buff Chickpea, spreading the love to all of his friends, who couldn't be nicer with their feedback. He is always emailing me with praise for my latest recipe addition, both his own and from his friends. When I last spoke with him, he mentioned something about a flan, but school was just beginning again for Spring semester, so I sort of put it in the back of my mind. When my sister told me we would be going to my Uncle Garrett's house for lunch last Sunday, and that Eddie would also be going, I remembered the flan he had such high hopes for.

I had never made anything like this before, so I was a little nervous as to the outcome. Would it set up in the fridge? Would the caramel stick to the bottom of the dish? Would I be able to invert the flan onto another dish without a huge collapse? Yes, yes, and yes. The flan could not have been easier to make, and was even easier to flip out of the glass pan, with Eddie's help, making for quite the presentation.


The final product resulted in an incredibly smooth and creamy custard. I was hesitant about the texture, but my first bite erased any and all initial doubts. Sweet, but not overly so, and enriched with vanilla and hazelnut undertones, it reminded me of a lightened creme brulee. Popularized by the Latin community, my Uncle assured me I had created some stiff competition for his flan-obsessed friends. Competing for the perfect flan has resulted in a number of taste testings by my uncle, and when he told me his friends had some work to do to catch up to me, I couldn't have been more pleased.


La Golondrina Cafe's Flan
Adapted from the Los Angeles Times

3/4 cup sugar
1/2 cup freshly squeezed orange juice (about 2 oranges)
5 eggs
2 1/2 (14-ounce) cans condensed milk
1 1/2 (12-ounce) cans evaporated milk
1 3/4 cups milk
1 tablespoon amaretto
1 tablespoon vanilla


In a medium, heavy-bottom saucepan, combine the sugar with the orange juice and one-fourth cup water. Bring to a boil, stirring occasionally until the sugar is completely dissolved. Continue to cook until the sugar caramelizes and turns an amber color, then remove from the heat and immediately pour into a 13-by-9-inch glass baking dish and allow to cool to room temperature. It will harden to the bottom of the dish. Don't worry, as it cooks and cools, it will turn into a syrup and make for easy removal out of the dish.*

Heat the oven to 300 degrees. In a large bowl, whisk together the eggs, then whisk in the condensed, evaporated and regular milks. Whisk in the amaretto and vanilla, and then pour into the baking dish over the caramel.

Place the dish inside a large roasting pan (the roasting pan must be big enough so that there is a 1-inch clearance on all sides) and fill it with enough hot water so that it comes halfway up the side of the glass baking dish. Place the pan in the oven and cook 2 hours, until a knife inserted near the center of the flan comes out clean. It will be quite jiggly at this point, but will set as it cools. Remove the flan from the water bath and allow to cool, then place in the refrigerator, loosely covered, to chill until cold, preferably overnight. Invert onto a platter and serve immediately.

*As this was my first time baking flan, I was nervous about getting it out of the glass dish when it came time to invert it. To my delight, it slid right out, no problem. But in case there were any issues, I had made a caramel sauce and whipped cream to hide any blemishes. An excellent addition, but not needed by any means. The syrup that emerged naturally from the flan itself was more than enough to drizzle on top of each serving.


Eddie's Flan


To return the proud uncle love, I encourage all of you to check out "The Calico Buffalo," seen in the right sidebar. It's a wonderfully composed book, with a beautiful message, written and illustrated by my extremely talented Uncle Eddie.


2.15.2009

Pisto Manchego with Eggs

Pisto Manchego with Eggs

Did You Know? White shelled eggs are produced by hens with white feathers and white ear lobes. Brown shelled eggs are produced by hens with red feathers and red ear lobes. Brown egg layers usually are slightly larger and require more food, thus brown eggs usually cost more than white eggs.

Just in this past year have my tastebuds developed a love for eggs. I've always eaten a healthy diet, but when I started going to acupuncture, my doctors really examined the foods I was incorporating into my daily life. Surprisingly, I wasn't eating the type foods that my body required to function at it's best. So to get my system in its optimal condition, and my chi in balance, I reworked a lot of aspects of my life, diet being one of them. I was instructed to eat eggs, a lot of eggs. In fact, they were perfectly fine with me consuming at least a dozen every week, if not more. And while I didn't take it to that level most weeks, I did go from not eating eggs at all, to eating at least 1/2 a dozen every week.


Pisto Manchego with Eggs

This recipe came about in one of my late night recipe searches for things to do with eggs. If I was going to be eating a lot of eggs, I needed to find ways that I would enjoy them (scrambled not being one of them). To this day, I pretty much only enjoy them fried or poached, with the yolks still runny. This pisto manchego incorporates my love of vegetables with my new found love of poached eggs.

Swimming in a ratatouille base, the creamy egg yolks are blanketed by a firm white, making this dish perfect for breakfast, lunch, or dinner. I can't wait until Summer arrives, when the farmers markets spring up again, and you don't think you'll ever see the end of your zucchini and tomato bounty. Until then, here's the recipe...


Pisto Manchego with Eggs


Pisto Manchego with Eggs
Adapted from The New York Times: Recipes for Health section

2 tablespoons olive oil
1 medium onion, chopped
4 garlic cloves, minced
2 pounds zucchini, or a combination of green and yellow summer squash, diced
2 pounds tomatoes, peeled, seeded and chopped (juice reserved)
Salt & Pepper
4-6 eggs

Heat the oil in a large, heavy, nonstick skillet over medium heat, then add the onion. Stir often, until transluscent — about 5 minutes. Add the garlic and cook, stirring, for another minute or two until fragrant. Stir in the squash and 1/2 teaspoon salt, and cook for 5 minutes, until the squash is coated with oil and beginning to soften. Add the tomatoes, and salt to taste (3/4 to 1 teaspoon), and turn the heat to medium-high. Stir often for 5 to 10 minutes, until the tomatoes have slightly cooked down. Add the juice from the tomatoes plus 1/4 cup water, stir together, and turn the heat back down to medium-low. Cook uncovered for 30 to 35 minutes, until the vegetables are soft and easy to mash. Stir often until the mixture cooks down and begins to stick to the pan. From time to time, press on the squash with the back of your spoon so that it breaks down. Taste, adjust the salt, and add lots of pepper.

Using the back of your spoon, make 4-6 wells in the vegetable mixture and break an egg into each well. Sprinkle with salt and pepper. Cover the pan, and cook until the eggs have set, about six to eight minutes (the whites should be set, but the yolks should still be runny). Serve, using a spatula to dish out portions of pisto topped with an egg, or two.


Pisto Manchego with Eggs

2.11.2009

Strawberry Valentine Cupcakes

Strawberry Valentine Cupcakes


Did You Know? The Italian city of Verona, where Shakespeare's lovers Romeo and Juliet lived, receives about 1,000 letters addressed to Juliet every Valentine's Day.

With Valentine's Day quickly approaching, I thought pretty pink cupcakes seemed like the most appropriate post. Always loving the strawberry cupcakes made from a box mix, I've been wanting to make homemade ones for some time now. When I saw the awesome Valentine's decorating accessories at Michael's, I knew this would be the perfect time to use the already red strawberry to dye these soon-to-be exploded with pink cupcakes.

Like most girls, baking and decorating cupcakes is one of my favorite things to do in the kitchen. The limitations are endless, and you always end up with something pretty irresistible. Adorning most of my life in pink, why stop at the cupcake? Tucked inside dainty, heart-stamped cups, frosted with candy-sweet icing, and topped with an array of sprinkles, these cupcakes will make any girl swoon.


Strawberry Valentine Cupcakes


I love mixing and matching various patterns with an underlying theme, that being Valentine's Day here. To make all the same toppings or designs can get pretty repetitive, and when I get going, it's hard to refrain myself from trying to outdo the previously frosted cupcake.

As for the taste? I tried a cupcake without frosting first, and the strawberry flavor was there, but very faint. I may add a teaspoon of strawberry extract next time, or play around with the ingredients a bit. The color was so pretty though - a pale pink hue dotted with strawberry flecks, so natural and so satisfying. My second cupcake, a frosted and decorated one, was everything I had hoped for. The strawberry frosting was so flavorful, and definately made up for the cake alone. These are for sure my favorite cupcakes to date, but like I said, I'm partial to anything pink.

Strawberry Valentine Frosting


Strawberry Valentine Cupcakes
Makes around 20 cupcakes

2 cups unbleached flour
1 cup natural cane sugar
1 tablespoon baking powder
1 teaspoon sea salt
4 eggs
1/2 cup canola oil
1 cup puréed strawberries, fresh or frozen, thawed
1/2 cup soy milk

Preheat oven to 350°F. Line cupcake pans with paper cups, and set aside.

Combine dry ingredients in a large bowl.

In the bowl of an electric mixer, beat together remaining ingredients. Add this to the dry, beating with a wire whisk.

Pour into prepared cupcake tins. Bake for 18-20 minutes, or until done when tested with a toothpick.


Strawberry Frosting
I used a combination of frostings. I made this recipe, which didn't set up quite as I had hoped, so I folded it into a separate confectioners frosting (shown below).

1 (16 oz.) box confectioners sugar
1 stick (1/2 cup) vegan margarine or shortening (I used Earth Balance)
1/4 cup of the meringue frosting previously made, plus additional to fold in.


Using an electric mixer, beat the sugar, margarine/shortening and 1/4 cup of meringue icing until fluffy. Add more meringue icing as needed. The frosting should be thick at this point, but you will fold in additional meringue icing to lighten it up.

Once you finish creaming the sugar, butter, and meringue icing, fold in another 1/2 cup or so of the meringue icing, until you reach your desired consistency.

*If this all seems too confusing to you, by all means use your own frosting recipe (or the frosting given in the original recipe). I'm sure just folding in some strawberry puree to a buttercream recipe would work fine also. I just didn't want to waste the meringue icing I had put together.

Strawberry Valentine Cupcakes

Happy Valentine's Day!


2.07.2009

Honey Walnut Pie

Honey Walnut Pie

Did You Know? The sugar concentration in honey is so high that no bacteria can live in it. It has even been used in hospitals as a dressing for wounds, burns, and cuts.

My dad has been going to classes to become a bee keeper, so I wanted to make him this honey-rich dessert, courtesy of Martha Stewart. I can only imagine how much tastier it will be once we have honey straight from the bees in our backyard. It sounds like a strange thing to get into, but with 75% of our food coming from the honey bee, it's really an important hobby. So to see where his new fascination of all things bees came from, I came home from school on Thursday night to go to bee school with my dad, and it was so interesting. There's definately a lot of information thrown at you, all of which will be fun to share with you through my "Did You Know" section.


Honey Walnut Pie

Now onto the pie. The crust definately makes it, so don't skimp on ingredients, and make sure to use a good pate brisee recipe (like the one below). Full of finely chopped walnuts, and sticky, sweet honey, this pie is like a giant piece of baklava. My parents loved the flavors immediately, but I found a refrigerated-slice the next morning to be much more enjoyable.


Honey Walnut Pie

The orange zest was a little overpowering for me, so I might omit that the next time. My brother and I were brainstorming other ways I could take this dessert, and we both thought a little cinnamon would be nice. He also suggested some mini-chocolate chips or shaved chocolate if that's your preference. However you enjoy this, it's sure to please. It's not too sweet, which I love, and made for an excellent breakfast the day after. I'd love to hear any variations you might have in mind, so let me know. Enjoy!


Honey Walnut Pie

Honey Walnut Pie
The original recipe calls for 1/2 teaspoon of orange zest. I might leave this out the next time, and also add some cinnamon.

3 tablespoons all-purpose flour, plus more for work surface
Pate Brisee, Walnut Variation
4 large eggs, lightly beaten, plus 1 lightly beaten egg for brushing
3/4 cup honey
3/4 cup granulated sugar
1/2 stick unsalted butter, melted
1/2 teaspoon finely grated orange zest, plus 1/4 cup fresh orange juice
1/2 teaspoon salt
2 cups coarsely chopped walnuts
Fine sanding sugar


Preheat oven to 350 degrees.

Place a 10-inch tart ring on a baking sheet lined with parchment; set aside. On a lightly floured surface, roll out 1 disk of dough to 1/8 inch thick; cut into a 14-inch round. Fit into tart ring; trim overhang to 1/2 inch. Freeze while making filling.

Whisk together 4 eggs, the honey, granulated sugar, butter, orange zest and juice, salt, and flour in a large bowl. Stir in walnuts. Pour into tart shell.

On a lightly floured surface, roll out remaining disk of dough to 1/8 inch thick. Cut into an 11-inch round. Cut 5 slits for vents. Drape over filling. Trim overhang to 1 inch; fold over bottom crust. Press edges to seal, and tuck into ring. Brush with remaining beaten egg, and sprinkle with sanding sugar.

Bake until a knife inserted in one of the vents comes out clean, 45 to 50 minutes. Transfer sheet to a wire rack; let cool completely. Remove ring before serving. Can be stored, covered, overnight.

*I had mine both room temperature and refrigerated, and preferred the latter. The cold, buttery crust was perfect, and the filling got a chance to set up.


Honey Walnut Pie

2.03.2009

Curried Cauliflower Soup

Curried Cauliflower Soup

Did You Know? Scientists believe that turmeric, the spice which turns curry dishes yellow, stops the growth of leukemia cells, and seems to protect against damage from cigarette smoke and some processed food.

I'm guessing I'm like many of you out there. You subscribe to delicious magazines, with all the intentions in the world to recreate all of the recipes you drool over while flipping through the pages. Only to find a stack of read-through magazines at the end of the year, and no recipes to show for it. Determined to change this, when my next issue of Vegetarian Times arrived in the mail, I put my apron on, and got cooking. Soup was the prominent feature of the January issue, so that is what you find yourself with today. Curried cauliflower soup to be exact.

With a snow storm at bay at any given moment, soup is so nourishing this time of year. Thick, creamy, and intensely spiced, this soup is definately for the curry lovers out there. I was so surprised how full-bodied this soup ended up. The pureed cauliflower provided the perfect texture of without any added cream.


Curried Cauliflower Soup

I used one apple here, but I may add another the next time. It definately helped to cut the spiciness of the curry powder, but the apple's flavor didn't really come through. I ended up serving this alongside apple slices (for dipping), but chopping them up even finer would make for an excellent garnish. I imagine a fruit chutney would be perfect as well. The recipe calls for one tablespoon of curry powder. If you're not a huge fan of spicy dishes, I would start with a 1/2 tablespoon, as the full tablespoon packed a lot of punch. I usually add buffalo sauce to everything, and I found myself taking a bite of an apple after each spoonful of soup. All that aside, this soup was really tasty, and a big hit when I served it for lunch the other week. Enjoy!


Curried Cauliflower Soup


Curried Cauliflower Soup
If you find this soup to be on the thick side for your liking, I imagine a little coconut milk to smooth things out would be wonderful. It would also help to mellow out the heat.

2 tablespoons olive oil
1 small onion, chopped
1 medium apple (I used Golden Delicious)
1 tablespoon curry powder (I used red curry)
1 clove garlic, sliced
1 large head cauliflower, chopped into 1-inch pieces
4 cups vegetable broth
1 teaspoon honey or agave nectar*
1 teaspoon rice wine vinegar


Heat oil in a large pot over medium-high heat. Add onion, and saute for 5 to 7 minutes, or until soft and golden. Stir in apple, curry powder, and garlic, and cook for another 2 minutes, until the curry powder turns a deep yellow.

Add cauliflower and vegetable broth, and bring to a simmer. Cover, reduce heat to medium-low, and simmer for 20 minutes. Cool 20 minutes (helps to deepen the flavors), then blend in a food processor until smooth. Stir in honey and vinegar, and season with salt, if needed.

*I know it's only one teaspoon, but don't leave out the honey/agave, it really rounded out the flavors.


Back to Top