11.30.2008

Blueberry Pie

Blueberry Pie

Did You Know? Early American colonists made grey paint by boiling blueberries in milk.

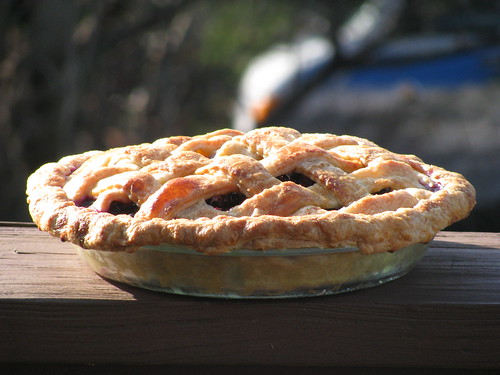
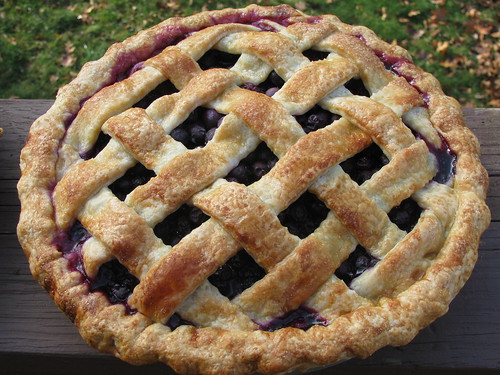
Here's a recipe for one of the many pies I made for Thanksgiving last Thursday. This particular blueberry pie was really flavorful. The fresh berries remained pretty much in tact, but obtained a much sweeter flavor throughout the baking process. It was juicy and bright purple, and everything a homemade fruit pie should be. The lattice crust really sent it over the top, but you could simply drape a dough round on top. Either way, you won't be disappointed...


Blueberry Pie

Blueberry Pie
All-purpose flour, for dusting
Pate Brisee (or your favorite double-crust recipe)
4 pints blueberries
1/2 cup sugar
1/4 cup cornstarch
1 tablespoon freshly squeezed lemon juice
1 teaspoon vanilla extract
A few dashes of cinnamon
2 tablespoons unsalted butter, cut into small pieces
1 large egg yolk
1 tablespoon heavy cream

Roll out one of the dough rounds, on a lightly floured surface, into a 12-inch circle and fit into a 9-inch pie plate. Roll the other round in the same manner (or cut it into strips for a lattice crust) and place on a baking sheet. Freeze both top and bottom for 30 minutes.

Place blueberries in a large bowl. With your hands, crush about 1 cup of the berries. Add sugar, cornstarch, vanilla, cinnamon, and lemon juice; stir to combine. Spoon mixture into chilled pie shell, mounding berries slightly in the center. Dot with butter. Drape the top crust over the blueberry filling, or style the top as you wish. Using your fingers, gently press both layers of dough along the edge to seal, and crimp as desired.

Using a paring knife, cut several vents in the top of dough to allow steam to escape. In a small bowl, whisk together egg yolk and cream. Brush surface with egg wash, being careful not to let it pool. Freeze the pie for another 30 minutes. Meanwhile, preheat the oven to 400 degrees, with rack in lower third.

Place pie on a parchment-lined baking sheet. Bake until crust begins to turn golden, about 20 minutes. Reduce oven temperature to 350 degrees. Continue baking, rotating sheet halfway through, until crust is deep golden brown and juices are bubbling and have thickened, 40 to 50 minutes more. Transfer pie to a wire rack to cool completely. The pie is best eaten the day it is baked.


11.28.2008

Whole Wheat Crescents

Whole Wheat Crescents

Did You Know? There was no milk, cheese, bread, butter or pumpkin pie at the original Thanksgiving Day feast. Good thing this holiday has evolved!

My brother has always loved the addition of crescent rolls to our Thanksgiving table, so I was looking for a healthy alternative that would do the trick. I came across these over at 101 Cookbooks, and they looked very similar in shape. Turns out they're even better than the real thing!

I'll be posting some more of the dishes and desserts my family enjoyed on Thursday over the next week or so, with the addition of a few leftover ideas. Feel free to comment with your own Thanksgiving favorites or any ideas that you may have for those endless leftovers. Until then, here's the crescent recipe...


Whole Wheat Crescents

Whole Wheat Crescents
4 1/2 teaspoons instant yeast
1 3/4 cups warm water
2 tablespoons brown sugar
3 tablespoons grapeseed oil (any mild tasting oil)
1/4 cup honey
2 teaspoons salt
2 1/2 cups whole wheat flour
2-2 1/2 cups bread flour
4 tablespoons butter, melted


Dissolve the yeast in the water, and let sit for about 10 minutes, or until frothy.

Mix in the brown sugar, oil, honey, salt, and 1 1/2 cups whole wheat flour.

Mix in the remaining whole wheat flour, and enough bread flour to make a stiff dough (I use the whole 2 1/2 cups).

Knead on a lightly floured surface for about 10 minutes, then form into a ball. Place in a lightly greased bowl, cover with plastic wrap, and let rise for about 1 1/2 hours.

After the dough has risen, divide it into 3 pieces, I just eyeball it. Shape into balls, and let rest for another 10 minutes.

Roll out each ball into a 10-inch circle, and spread with 1/3 of the melted butter. Using a pizza wheel, cut each circle into 8 wedges (like a pizza). Beginning at the widest part, roll each wedge towards the center, creating a crescent-shaped roll. Place rolls on a few greased baking sheets, cover with plastic wrap, and let rise for about 30 minutes.

Preheat oven to 375. Uncover the rolls, and brush each with an eggwash (lightly beaten egg + tbsp. cream), and bake for about 15 minutes.

These are best served straight from the oven, and sandwiched with additional butter.


11.20.2008

Cranberry Apricot Chutney

Cranberries

Did You Know? There are about 4,400 cranberries in one gallon of juice!

Here's another recipe to prepare for the holidays, courtesy of Elana's Pantry. Compared to other cranberry sauces, this particular sauce does not include any granulated sugar, and only two tablespoons of agave. With all the heavy dishes being consumed throughout the holidays, the health benefits of cranberries should be a selling point for this dish. As a huge cranberry fan, I loved this version. My family on the other hand, thought it was a bit tart. You may want to increase the agave nectar or add 1/4-1/2 cup of sugar, you be the judge...


Cranberry Apricot Chutney


Cranberry Apricot Chutney
1 pound fresh cranberries
1 1/2 cups water
1/2 cup dried apricots, cut into quarters
1/4 cup currants
2 tablespoons agave nectar
1/4 teaspoon ginger zest
1 teaspoon orange zest


Wash cranberries thoroughly, discarding the soft and rotten ones.

Add cranberries and water to a medium saucepan, and bring to a boil. Reduce heat, and simmer for 10 minutes.

Add the apricots and currants, and simmer for 5 minutes. Add the agave and both zests, and simmer for an additional 5 minutes. Enjoy warm, or let cool in the refrigerator.


11.19.2008

Mushroom & Barley Stuffed Apples

Mushroom & Barley Stuffed Apples


Did You Know? Mushrooms will double in size every 24 hours, so a Portabella is not that much older than a Cremini!

Stuffed fruits and vegetables are great additions to any vegetarian meal. This particular dish has flavors both sweet and savory, and would be a great side on your Thanksgiving table. The mushrooms and barley provide a meaty base, while the cranberries offer a slight tartness. The apple's sweetness balances the dish as a whole. I serve half an apple as a side, but a whole apple would be a great alternative entree for any vegetarian or vegan guest. Feel free to add baked tofu, or substitute any of your favorite nuts.


Mushroom & Barley Stuffed Apples


Mushroom & Barley Stuffed Apples
4 sturdy apples (Golden Delicious, Granny Smith...)
2 tablespoons olive oil
16 ounces mushrooms (I used button)
1 small onion, diced
3/4 cup barley
1 2/3 cup vegetable broth
1/2 cup dried cranberries
1/2 cup hazelnuts or walnuts, toasted and chopped
Salt and Pepper


In a large saute pan, heat olive oil over medium heat. Add mushrooms, and let sit for a few minutes, without stirring, so they can brown. Add onion, salt, and pepper, and saute a few minutes longer until onion is translucent. Add barley and toast for a couple minutes. Stir in broth and cranberries, and season to taste. Bring to a boil, reduce heat, then cover and simmer until the liquid is absorbed and barley is tender, about 45 minutes.

Preheat oven to 350.

Slice apples in half lengthwise, and remove core and some of the flesh with a small spoon. Use a fork to prick apple a few times so they don't explode. Before placing in a baking dish, cut a small slice off the bottom of each apple half so they do not wobble in the dish. Place in a baking dish.

When the barley mixture is ready, stir in the nuts. Using an ice-cream scoop, mound barley on top of apples. Pack any leftover mixture in between the apples in the dish. Pour a little water (1/4-1/2 cup) in the baking dish, and cover with foil. Bake for about 20 minutes. Remove foil and bake 10 minutes more.


11.17.2008

Pumpernickel Bread

Pumpernickel Bread

Did You Know? It takes 9 seconds for a combine to harvest enough wheat to make about 70 loaves of bread!

I'd been looking for a simple pumpernickel and/or rye bread recipe, when I stumbled upon this one at the Bread Blog. Make sure you check out Chuck's site, the photos are gorgeous, and the recipe instructions are so clear. I've made numerous breads on this site, all with amazing results. This particular recipe doesn't include any hard to find pumpernickel flour or rye meal. I used rye flour I found in the bulk bins at Whole Foods and it came out really well. Slathered with sweet butter and alongside a nice salad, it was a great light and satisfying supper...


Pumpernickel Bread
Night before Ingredients:
1 cup dark rye flour
3/4 cup warm water
1/4 teaspoon instant yeast

Day of Ingredients:
2 1/2 cups bread flour
1/2 cup whole wheat flour
1/2 cup bran flakes
2 tablespoons molasses
1 tablespoon cocoa power
1 1/2 teaspoons salt
1 teaspoon instant yeast
2 tablespoons grapeseed oil
1 cup warm water


The night before you make this bread, add all of the "night before ingredients" into a bowl and mix till smooth. Cover with plastic wrap allow to rest on the counter for 12-16 hours, or overnight.

The next day mix the night before mixture with the rest of the water in a large bowl. Mix in the bran, molasses, oil, cocoa powder, salt, instant yeast and whole wheat flour with a wooden spoon. Allow to rest uncovered for 10 minutes.

Start to add in the bread flour, about a half cup at a time. After each addition mix with a wooden spoon till smooth. Once the dough becomes too hard to mix, pour out onto a floured surface. Continue to add more flour and knead for 10 minute. You want the dough to be a little sticky, but not sticking to your hands. After kneading, place the dough into a lightly oiled bowl. Turn over a few times to lightly coat all sides. Cover with plastic wrap and allow to rest for 2 hours.

After resting, lightly deflate the dough and place onto a baking sheet lined with parchment paper and sprinkled with corn meal. Cover with plastic wrap and allow to rest a second time for about 1 hour.

About 45 minutes into the resting, preheat your oven to 425. Put an overproof dish into the oven and when ready to put the bread in, fill the dish with boiling water to create steam. Score the bread a few times, place in the oven, and immediately shut the door so the steam doesn't escape. Bake for about 35-40 minutes, or until the bottom sounds hollow when tapped.


Roasted Garlic Mashed Potatoes

Roasted Garlic

Did You Know? During Ancient Greek and Roman weddings, brides carried bouquets of garlic and herbs instead of flowers!

Researching Thanksgiving meal ideas has proven to be quite the task. There are so many recipes, and everyone has a unique variation. I came across this recipe at Closet Cooking, and knew it would be good when I saw the addition of cream cheese. Although it's not one of my favorites, Martha swears by it when it comes to mashed potatoes. It's not the most healthful dish, by any means, but it's for Thanksgiving, so enjoy...


Roasted Garlic Mashed Potatoes
2 pounds potatoes, quartered (I used yukon gold)
1 head roasted garlic, cloves squeezed from bulb
1/2 cup half and half, warmed in microwave
4 ounces cream cheese, softened
4 tablespoons butter, softened
Salt and Pepper


Boil the potatoes in a large pot of water until fork tender, 20 minutes or so. Drain and return to pot. Mash potatoes along with garlic, half and half, cream cheese, and butter. Season with salt and pepper.


11.11.2008

Hazelnut Spiced Pumpkin Pie

Hazelnut Spiced Pumpkin Pie

Did You Know? The largest pumpkin pie ever made was over five feet in diameter and weighed over 350 pounds. It used 80 pounds of cooked pumpkin, 36 pounds of sugar, 12 dozen eggs and took six hours to bake.

I polled my family on the types of pies they would like on the Thanksgiving table this year, and like I had predicted, everyone had a different request. So it looks like I will be making 4 pies this time around. Seeing that pumpkin is my favorite, I had numerous recipes that I wanted to experiment with before deciding on the final pie that would be served on Thanksgiving. Last week I had made a rich chocolate pumpkin pie with a graham cracker crust, and it turned out really well. But I must admit, I like the flavor of the pumpkin to be the star, and I think the chocolate took over a little too much. It was sort of like a cross between chocolate pudding pie, and pumpkin pie.

Today, I gave it another shot with Heidi's beautiful Spice-kissed Pumpkin Pie over at 101 Cookbooks. Everything she makes looks and tastes incredible, and this definately followed suit with the rest of her recipes. I'm almost positive this will be the pie served on the big day...


Pumpkin Pieces


Hazelnut Spiced Pumpkin Pie
1 pre-baked pie crust (I used this vegan crust recipe)
2 cups toasted hazelnuts, divided
1/2 cup dark brown sugar
1 tablespoon pumpkin pie spice
1 teaspoon salt
1 tablespoon cornstarch
1 1/2 cups roasted pumpkin puree
1 teaspoon madagascar vanilla extract
3 eggs, plus 1 for the egg-wash
1 cup light coconut milk
1 tablespoon cream


Preheat oven to 350

Puree 1 1/2 cups of the toasted hazelnuts in a food processor until they turn into a paste. Set aside. Chop the remaining 1/2 cup of hazelnuts and set aside for garnish.

To make the filling, whisk together the brown sugar, pumpkin pie spice, salt, and cornstarch. Stir in the pumpkin puree and vanilla. Next, stir in the 3 eggs and coconut milk until just combined. Set aside.

Before filling the pie crust, crumble the hazelnut paste on top of the pie dough in the pie plate, quickly and gently press it into a thin layer across the bottom, creating a layer of hazelnuts that will sit between the dough and the filling. Using the last egg, create a wash by whisking it with a tablespoon of cream. Gently brush the edges of the pie dough. Use a fork to prick the pie dough a few times to prevent air bubbles. Pour the filling into the crust and bake for about 50 minutes - the center of the pie should just barely jiggle when you move the pie, and the edges should be set.

Let the pie cool (I put mine in the fridge overnight), and top with fresh whipped cream and a sprinkling of the toasted hazelnuts. Enjoy!


11.10.2008

Roasted Pepper & Feta Dip

Did You Know? Habanero peppers are 30-50 times hotter than Jalapeno peppers!

We still had some lingering jalepeno peppers in our garden, so after a few days of staring at them, I decided to put them to use. After scanning some of my favorite sites for some dinner inspiration, I landed on this Greek feta dip over at Closet Cooking. I had made this dip before with excellent results, served at room temperature slathered on some homemade chickpea burgers. The combination of sweet sundried tomatoes with the salty feta cheese is so smooth and satisfying. The heat from the jalapenos rounds out this fabulous spread. Even if you don't make this dip (but you really should), make sure you check out Kevin's blog over at Closet Cooking. His unique recipes have made weekly appearances on my family's dinner table time and time again.

Roasted Pepper & Feta Dip
1 Roasted red pepper
2 Roasted jalapeno peppers
4 Ounces feta cheese
2 Green onions
2 Sundried tomatoes (soaked in oil)
1 Garlic clove
Juice of 1 lemon

Puree everything in a food processor. Enjoy as a dip with pita chips, as a spread on sandwiches or burgers, or by the spoonful...doesn't get much easier than that!


11.09.2008

Whipped Butternut & Apple Puree

Butternut & Apple Puree

Did You Know? Dollar for dollar, butternut squash provides more value than any other squash.

With the holidays approaching, I have been researching recipes to get my menus in place. One dish that always has a reoccuring spot on our Thanksgiving table is my Mema's butternut squash and apple puree. It's a cross between mashed squash and apple sauce with a subtle citrus flavor from the orange juice. The combinations are some of my favorites, and I know you'll like them too...


Whipped Butternut & Apple Puree
4 Butternut squash (choose ones that are on the darker side with no sheen)
Olive Oil
Salt and Pepper
3 Cooking apples (I use MacIntosh)
Orange Juice
Cinnamon

Preheat oven to 400

Cut squash in half and scoop out insides (discard or roast seeds for later use). Drizzle with olive oil, and season with salt and pepper. Place on a baking sheet, and roast cut side up for about an hour. Remove from oven, and scoop insides out into a food processor.

Meanwhile, peel and cut apples into large chunks. Place chunks in a medium saucepan, and pour in enough orange juice to cover the apples halfway. Season generously with cinnamon. Cover and cook on medium heat until apples break down and form a nice sauce.

When apples are finished cooking, add them to the food processor along with the squash. Puree until nice and whipped, and lump-free. Enjoy with your Thanksgiving dinner! Leftovers reheat nicely, or thin out any extra with a little vegetable broth or apple juice for a soothing autumn soup.


Caramelized Tomato & Onion Marinara

Roasted Grape Tomatoes

Did You Know? During the nineteenth century, American cookbooks warned that tomatoes should be cooked for a minimum of three hours before eating to eliminate the raw taste. People were cautioned not to eat tomatoes raw because they were still suspected to be poisonous.

Every spring I conjure up a list of vegetables for my Dad to include in "our" vegetable garden. Somehow when it's time to actually build the garden, it becomes "his" garden. I love all of the outcomes of the finished garden when summer rolls in, but I'd much rather get my Dad a drink every now and then, than to dig up a garden with him.

So after much directing on my part and building on my Dad's part, the garden gets finished, and then we wait. It's always exciting to see the first few fruits, but then I usually forget about the garden all together until my Dad starts complaining that he made me this vegetable garden that I begged for, and the vegetables just sit down there, waiting to be cooked.


This summer, like all other summers, we had an abundance of tomatoes: beefsteak, grape, cherry, pear...I had been researching recipes, and that's when I thought of my Mema, and how my Dad always said she made the best spaghetti sauce when he was younger. Knowing that if I called her she wouldn't be able to remember how she actually made her sauce, I decided to think of something on my own. I looked at a few recipes for some ideas, but all of them were pretty basic. Incorporating flavors that I love with the ingredients at hand, I ended up with a pretty tasty sauce. Sweet from the caramelized onions, and rich from the roasted cherry tomatoes, this sauce is sure to liven up any dish it's added to...


Caramelized Tomato & Onion Marinara
Cherry tomatoes...enough to fill a large baking sheet when sliced in half
8 Beefsteak tomatoes, cored and diced into large chunks
2 Sweet onions
Olive Oil
Salt and Pepper


Preheat oven to 400

Slice cherry tomatoes in half and toss on a baking sheet with a generous splash of olive oil, salt, and pepper. Roast until skins have browned and are caramelized all over, about 20 minutes. Set aside.

Meanwhile, make the caramelized onions. Heat a couple tablespoons of olive oil in a large pot, over medium heat. Add sliced onions, salt, and pepper. When onions become translucent, lower heat a little and continue to cook until onions are a deep, golden brown. The whole process take about 45 minutes.

When onions are done, add roasted cherry and beefsteak tomatoes, and season with salt and pepper. Stir to combine everything, cover, and cook on medium heat until tomatoes break down and form a sauce. Working in batches, puree sauce in a blender or food processor. Add sauce back into the pot and simmer for about an hour with the lid half on. When finished tear up some fresh basil, add it to the pot, and enjoy all your future creations!

This recipe makes a ton of sauce. I usually freeze some to enjoy throughout the year.


11.08.2008

Hocus Pocus

Halloween Cupcakes


It's a little late to be posting a Halloween cupcake, but it's my first entry, and I just wanted to get a feel for how this whole "blog thing" works. I thought my first post should include some of my favorites...Halloween and Cupcakes. Anyways, I made these while watching my all time fave Halloween movie...Hocus Pocus, and handed them out to all the trick-or-treaters on Halloween Night.


Halloween Cupcakes


Back to Top